Overview
VMware recently released the Access Point solution, which is a secure gateway for Horizon 6. The solution is deployed as a Linux based Virtual Appliance with a REST based API for querying and updating the appliance. It is deployed as an OVA, which can be done in a couple of ways. You can deploy it via vCenter with the “Deploy OVF Template” wizard or with the VMware OVF tool. The OVF tool is the preferred method as all of the API parameters to configure View and Certificates can be passed as a JSON string into the OVF tool. The issue is that it is command line based and the input string can become very complicated and hard to properly construct. Below is a sample OVF Tool Input string to deploy an Access Point appliance:
Sample OVF Tool Input String:
As you can see, it can be a very difficult string to construct properly. In addition, if you are updating the certificates for the appliance, the PEM files must be formatted into a single line string with appropriate embedded newline characters. This can all be very challenging and intimidating when attempting to deploy Access Point.
That is why I wrote this utility. It basically acts as a GUI wrapper for the OVF tool and will construct a proper OVF Tool input string including all of the JSON to be passed to the Access Point API.
VMware Access Point
Access Point has been covered in other articles. I am not going to cover much on Access Point in general other than what is below:
From the Deploying and Configuring Access Point Document:
Access Point functions as a secure gateway for users who want to access Horizon 6 desktops and applications from outside the corporate firewall.
Access Point appliances typically reside within a DMZ and act as a proxy host for connections inside your company’s trusted network. This design provides an additional layer of security by shielding View virtual desktops, application hosts, and View Connection Server instances from the public-facing Internet. Access Point directs authentication requests to the appropriate server and discards any un-authenticated request. The only remote desktop and application traffic that can enter the corporate data center is traffic on behalf of a strongly authenticated user. Users can access only the resources that they are authorized to access.
Access Point appliances fulfill the same role that was previously played by View security servers, but Access Point provides additional benefits:
- An Access Point appliance can be configured to point to either a View Connection Server instance or a load balancer that fronts a group of View Connection Server instances. This design means that you can combine remote and local traffic.
- Configuration of Access Point is independent of View Connection Server instances. Unlike with security servers, no pairing password is required to pair each security server with a single View Connection Server instance.
- Access Point appliances are deployed as hardened virtual appliances, which are based on a Linux appliance that has been customized to provide secure access. Extraneous modules have been removed to reduce potential threat access.
- Access Point uses a standard HTTP(S) protocol for communication with View Connection Server. JMS, IPsec, and AJP13 are not used.
My colleague Mark Richards has also written a great article, with a very detailed overview of Access Point, along with how deployment works with the OVF Tool and using the API.
Access Point Deployment Utility
Pre-requisites:
Microsoft .NET Framework 4.5
VMware OVF Tool 4.1 – Download
How it works:
As mentioned earlier this utility is a wrapper for the VMware OVF Tool. It allows you to input settings in a GUI and it will create the properly formatted input string for you. It also allows settings to be saved to an XML file and later imported to reduce how much data needs to be manually entered. It will also take a standard PEM certificate chain and private key and convert them to the proper format.
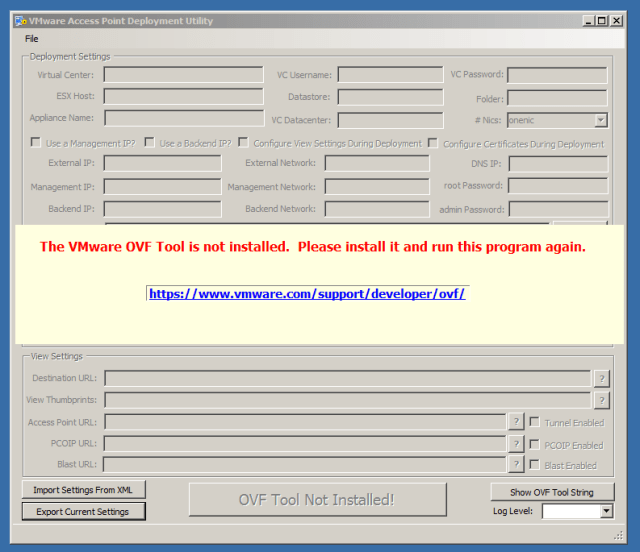
When you first start the application it reads the registry to see if the VMware OVF tool is installed and it reads where the tool is currently installed. If it is not detected, you will see the message below and you will need to install the OVF Tool to continue.
Once the OVF Tool is installed and detected you will see the following:
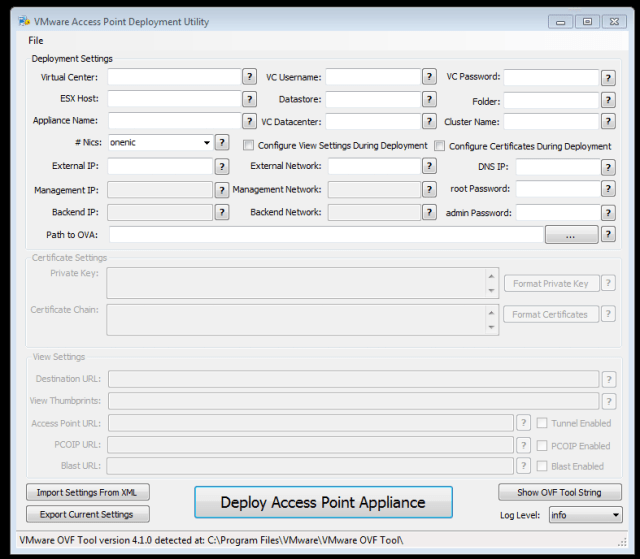
If you have previously exported settings, you can import them to populate the form by choosing “Import Settings from XML” and browsing to an export file. This is a quick way to import your settings for redeployment. The only settings that aren’t saved are passwords.
Configuration and Deployment
Let’s assume you don’t have any settings exported and you are running the application for the first time. We will go through all of the parameters and provide information on what they are and how they should be formatted.
Deployment Settings
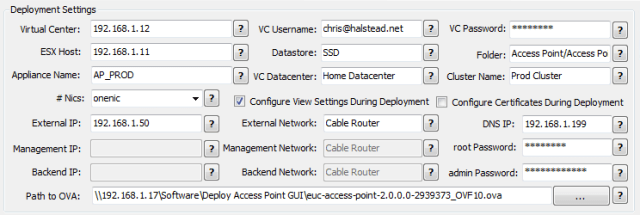 These are the basic settings required to deploy the Access Point appliance. Let’s go through each of them now.
Note: The OVF Tool is case sensitive for some of the objects in the vCenter locator string. Those entries are called out below
Note that each setting has a ![]() button that will show example format.
button that will show example format.
Virtual Center: This is the FQDN or IP address of the Virtual Center you want to deploy the appliance into. Example: 192.168.1.12
This setting is case sensitive!
VC Username: User that has access to deploy a Virtual Appliance in the Virtual Center you are targeting for deployment. This should be in the format user@domain.com. Example: chris@halstead.net or administrator@vsphere.local
VC Password: The password for the user you specified in the previous step.
ESX Host: The FQDN or IP of the ESX host where the appliance will be deployed. It must reside in the Virtual Center you specified earlier. Example: esxhost.company.com or 192.168.1.11
This setting is case sensitive!
Datastore: The datastore as defined in Virtual Center / vSphere that you want to place the appliance on. Example: VMFS_1
Folder: The folder you want to place the appliance in. This is optional and can be left blank or set to “/”. Example: External
This setting is case sensitive!
Appliance Name: The name of the Access Point appliance once it is deployed: Example: AP_PROD
VC Datacenter: The name of the Virtual Center datacenter you want to deploy this appliance to. Remember, you must have IP Pools defined for this datacenter with the network(s) you plan to use. Example: Home
This setting is case sensitive
Cluster Name: The name of the cluster in which the ESX host you are deploying to resides. If you are using clusters in your environment you must enter the cluster name. This is an optional field, and if not using a cluster it must be left blank. If you are using clusters in your environment it is a required field. Example: Prod Cluster
This setting is case sensitive!
#nics: How many nics are defined for the virtual appliance. If one, external, management and back-end traffic flows over the one nic. If two nics are configured, external has a dedicated nic and management and back-end traffic travel over the second nic. If three nics are defined, external traffic, management traffic and back-end traffic each have their own nic. Example: onenic
Use a management IP?: This option is automatically selected if using two or three nics.
Use a back-end IP?: This option is automatically selected when using three nics.
Configure View Settings During Deployment: Checking this box will enable the panel containing View Settings which will be passed into the appliance API via JSON and set during deployment.
Configure Certificates During Deployment: Checking this box will enable the panel containing certificate settings which will be passed into the appliance API via JSON and set during deployment.
External IP: IP address of the Virtual Appliance. Example: 192.168.1.50
External Network: The network label as defined in Virtual Center / vSphere for the port group you want to assign to the external interface. If using just one nic, this will be used by management and back-end traffic as well.
DNS IP: Single DNS Server*
Example: 192.168.1.199
*Note: Access Point is not properly accepting multiple DNS entries (event when deployed via vCenter). In SUSE, multiple DNS entries should be placed on separate “nameserver” lines and they are being placed on a single line. This is a known issue and at this time you must use a single DNS IP Address. This will be fixed in a future release of Access Point.
Management IP: IP address that will be bound to the management network if using two or three nics. Example: 192.168.1.51
Management Network: The network label as defined in Virtual Center / vSphere for the port group you want to assign to the management interface. If using two nics, this will be used by management and back-end traffic.
Back-End IP: address that will be bound to the back-end network if using three nics. Example: 192.168.1.52
Back-End Network: The network label as defined in Virtual Center / vSphere for the port group you want to assign to the back-end interface.
root password: Password used when connecting via console to the Access Point appliance. This must be a valid linux password. Example: VMware1
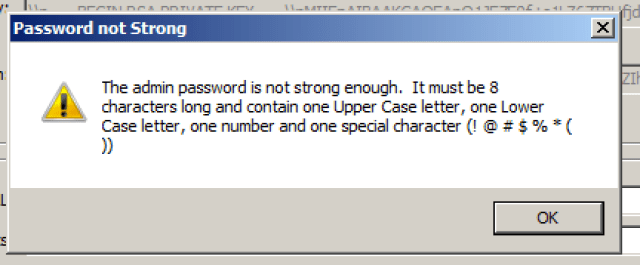
Admin password: Password used to connect to the REST API. This password must be 8 characters long and contain at least one each of the following: upper case letter, lower case letter, number and special character ! @ # $ % * ( ) Example: VMware1!
Path to OVA: This is the path to the OVA for VMware Access Point. You can type in the path or click the … button and browse to the file. Example:\\192.168.1.17\software\Deploy Access Point GUI\euc-access-point-2.0.0.0-2939373_OVF10.ova
At this point, all of the required fields to deploy are complete, but let’s walk through the process of configuring settings for Certificates and View before we deploy.
Certificate Settings
Certificates can also be configured at deployment. This is very important as the Access Point appliance is sitting in the DMZ and acts as a secure gateway for View.
Certificates can be set by selecting the checkbox “Configure Certificates During Deployment”. This will enable the certificates panel.
The certificate input boxes also have a ![]() button which will show proper format.
button which will show proper format.
The first thing you need to do is, to export the certificate you want to use for Access Point. In my case, it was the certificate I had on my View Security Server.
- Select the certificate you want to place on the Access Point appliance and choose “Export”

- Choose “Yes, export the private key”

- Select “Export all certificates in the certification path if possible”. This will make sure that any appropriate intermediate and root CA’s are exported. Create a password for the private key and save the exported certificate.
Once you have the exported certificate, use OpenSSL to convert the certificate to a PEM certificate chain and private key by running the following commands.
openssl pkcs12 -in mycertchain.pfx -nokeys -out mycertchain.pem
openssl pkcs12 -in mycertchain.pfx -nodes -nocerts -out myprivatekey.pem
This will create two PEM certificate files, one for the Private Key and one for the Certificate Chain. Once you have them in PEM format, you need to make sure that the private key is formatted like the example below:
—–BEGIN RSA PRIVATE KEY—–
Private Key data
—–END RSA PRIVATE KEY—–
The certificate chain must be in format of Target Certificate, Intermediate, Root, and must be formatted like the example below:
—–BEGIN CERTIFICATE—–
Target Certificate Data
—–END CERTIFICATE—–
—–BEGIN CERTIFICATE—–
Intermediate Certificate Data
—–END CERTIFICATE—–
—–BEGIN CERTIFICATE—–
Root Certificate Data
—–END CERTIFICATE—–
The certificates for Access Point are set via the API using JSON, so the certificate data must be formatted as a single line string with embedded newline characters. This can be a bit of a pain to do, so the application will format the certificates for you. You just need to have a properly formatted PEM private key and certificate chain. You copy them into the appropriate text boxes, and choose “Format Private Key” and “Format Certificates”
Before Formatting:

After Formatting:

If you need to modify the Private Key or Certificate chain, simply click the “Update Private Key” or “Update Certificates” button and it will clear out the box so you can paste in a new string.
This process will update the certificate on the Access Point appliance when you deploy it. This is much easier than having to go back in later and set it via the API.
View Settings
The primary use case for the Access Point appliance is access View desktops and applications. You can set all of the View configurations at deployment by selecting the “Configure View Settings During Deployment” checkbox and entering the proper information.

Existing View Connection Servers must be configured properly before using Access Point for secure external connections. From the “Configuring and Deploying Access Point” document:
Preparing View Connection Server for Use with Access Point
Administrators must perform specific tasks to ensure that View Connection Server works correctly with Access Point.
- If you plan to use a secure tunnel connection for client devices, disable the secure tunnel for View Connection Server. In View Administrator, go to the Edit View Connection Server Settings dialog box and deselect the check box called Use secure tunnel connection to machine. By default, the secure tunnel is enabled on the Access Point appliance.
- Disable the PCoIP secure gateway for View Connection Server. In View Administrator, go to the Edit View Connection Server Settings dialog box and deselect the check box called Use PCoIP Secure Gateway for PCoIP connections to machine. By default, the PCoIP secure gateway is enabled on the Access Point appliance.
- Disable the Blast secure gateway for View Connection Server. In View Administrator, go to the Edit View Connection Server Settings dialog box and deselect the check box called Use Blast Secure Gateway for HTML Access to machine. By default, the Blast secure gateway is enabled on the Access Point appliance.
- To use two-factor authentication with Horizon Client, such as RSA SecurID or RADIUS authentication, you must enable this feature on View Connection Server. See the topics about two-factor authentication in the View Administration document.
One you have these pre-requisites in place, you can deploy an Access Point appliance with View settings by providing in the following information in the application:
Destination URL: URL of a View connection server, or the address of a load balancer in front of View Connection servers. This URL must contain the protocol, FQDN or IP and port. example: https://192.168.1.30:443
View Thumbprints: Specifies a list of View Connection Server thumbprints. If you do not provide a comma separated list of thumbprints, the server certificates must be issued by a trusted CA. The format includes the algorithm (sha1 or md5) and the hexadecimal thumbprint digits. To find these properties, browse to the View Connection Server, click the lock icon in the address bar, and view the certificate details.
Note: The appliance will accept the the space delimited format from Chrome or the colon separated format from Firefox.
example: sha1=b6 77 dc 9c 19 94 2e f1 78 f0 ad 4b ec 85 d1 7a f8 8b dc 34 or
sha1=53:0A:BB:34:56:B1:4A:8A:9E:E6:A3:07:92:D7:1F:21:81:63:88:E6
NOTE – sha1 or md5 MUST be lower case!
Tunnel Enabled Checkbox: Specifies whether the View secure channel is enabled
Access Point URL: The external URL to be used by clients to connect to the Access Point appliance to tunnel secure connections. Example: view.chrisdhalstead.com:443
NOTE: Do NOT start this URL with https://
Enable PCOIP Checkbox: Specifies if the PCOIP Secure gateway is enabled
PCOIP URL: The external IP of the Access Point appliance which will be used as the PCOIP secure gateway. This should ONLY be an IP address and the port for PCOIP. Example: 68.134.246.117:4172
Blast Enabled Checkbox: Specifies if the Blast Secure gateway is enabled
Blast URL: Specifies an external URL of the Access Point appliance, which allows end users to make secure connections through the Blast Secure Gateway. Example: view.chrisdhalstead.com:8443
NOTE: Do NOT start this URL with https://
Deploy an Access Point Appliance
Back up settings
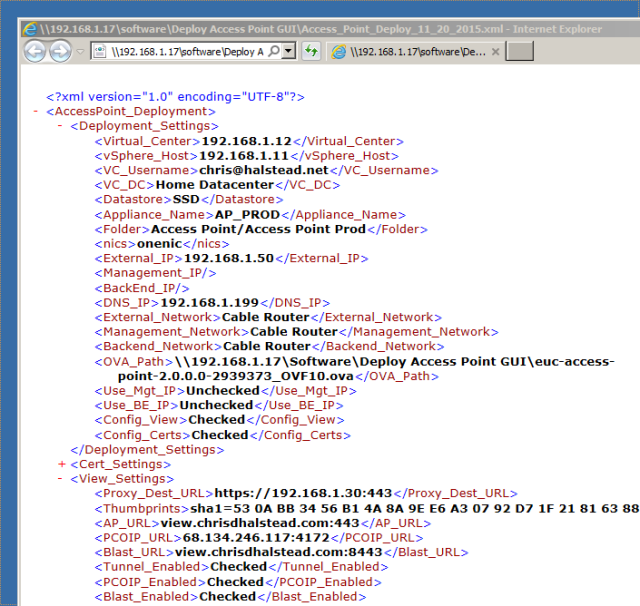
Now that all of the appropriate settings for deploying an Access Point appliance are in place, this is a good time to export out the settings that you have entered. Click the “Export Current Settings” button at the bottom left of the form and select a location to save the settings to.
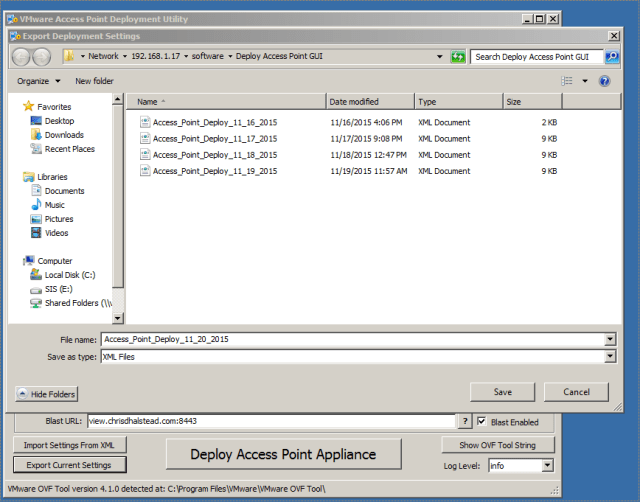
This will create an XML document with the values you had entered (with the exception of passwords) so they can easily be imported at a later date when deploying additional appliances.
Prior to deploying the appliance, or for troubleshooting, the generated input string can be shown and copied out at any time by clicking the “Show OVF Tool String” button on the bottom right of the form.
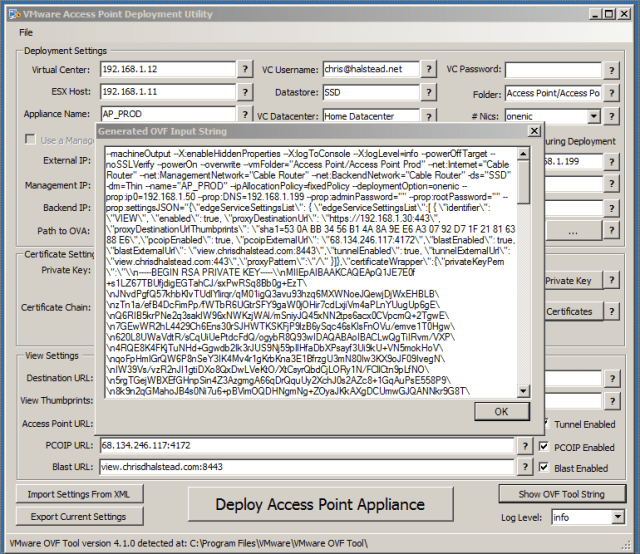
This string can be copied directly into the command line after the ovftool.exe for troubleshooting.
Deploy the Access Point Appliance
Once all of the settings are in place, you are ready to deploy the appliance.
Log Level: The ovftool log level can be adjusted prior to deployment by selecting the log level at the bottom right of the form.
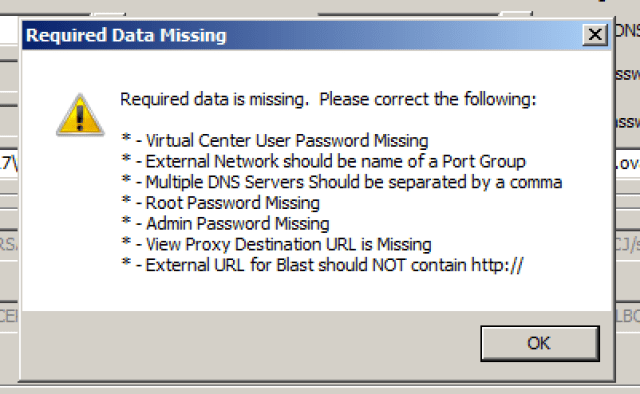
Click the “Deploy Access Point Appliance” button when you are ready to deploy. There is a lot of validation that happens before the appliance is actually deployed, so if any fields are mis-formatted or missing you may receive a message similar to the one below:
The final check is for the password strength of the Admin account. This account is used by the REST API service and if the password is not set properly the appliance will not be functional. If the password is not set to the proper strength (detailed above) you will receive the following message:
Once you have all of the required information set, you will see a dialog which shows the progress of the deployment process of the appliance. The data that is shown is the direct output from the OVFTool.

You can also monitor the deployment process from Virtual Center:

Verifying Deployment
Once the appliance is deployed, open the console and log in as:
username: root
password: (root password you specified during deployment)
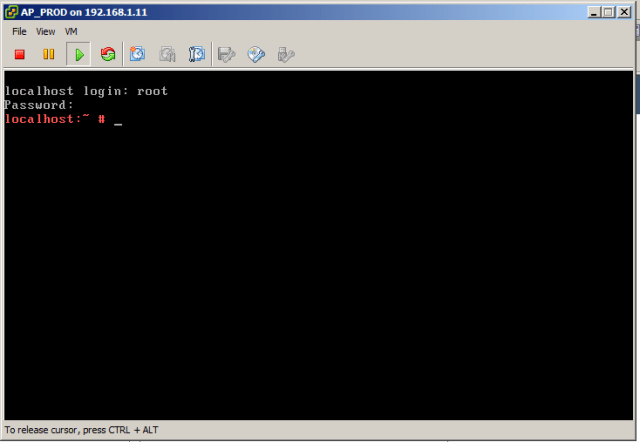
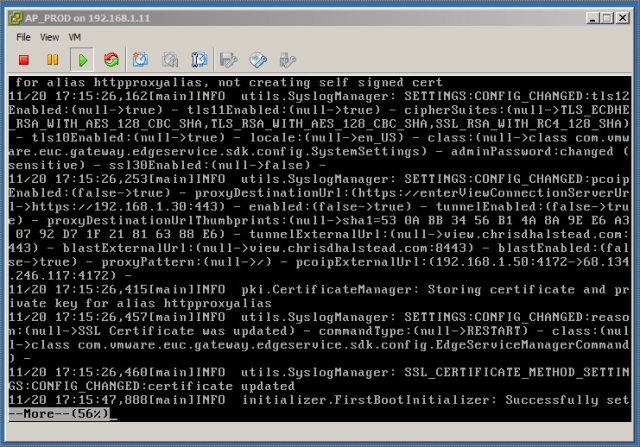
We are going to review the logs to see where our settings are being applied to the access point appliance.
NOTE: This same process is used for troubleshooting. If you notice the appliance is not responding and is CPU pegged, it is likely that an invalid parameter was passed in. This process will allow you to troubleshoot those issues as well.
Type the following to open the API log:
more /opt/vmware/gateway/logs/admin.log
Testing Deployment
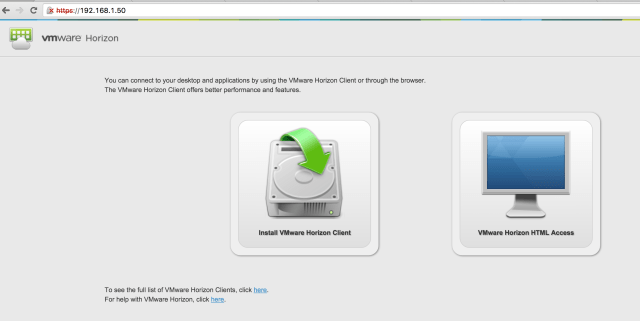
The first thing I test is to connect directly to the internal IP address of the Access Point appliance and make sure that it presents the appropriate View Connection server. This is a good way to test basic functionality of the Access Gateway without involving firewalls, etc.
Internal Access Test
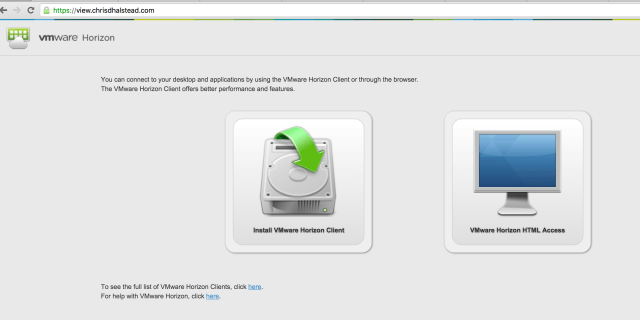
The final test is to connect to the external Access Point URL and verify that you are able to connect via all protocols configured (PCOIP, Blast).
This is also where you test that the certificate import was successful by verifying the appliance is using the certificate you set at deployment:
External Access Test

Verify Certificates

External Access Test
Congratulations! You have deployed the VMware Access Point Appliance!
You can download the application below to test in your environment.
Troubleshooting
The most common error is going to be a variant of the following:
Locator does not refer to an object: vi://chris%40halstead.net@192.168.1.12:443/Home Datacenter/host/192.168.1.11
This error means that some part of the OVF Tool locator string is not right. The OVF Tool is case sensitive when it comes to the locators. Check the following for typos or case sensitivity:
- Virtual Center
- ESX host
- Data Center
- Cluster
- Folder
Also, make sure you are not missing the Cluster name if you are using a cluster in your environment.
Download the Application
This is a 1.x version of the application and I haven’t been able to test all scenarios. I would appreciate if others can test in their environments and provide issues, feedback and suggestions to me. Thanks!
Changelog:
- 1.0.0.1
- Added check for short string such as * in Thumbprint
- 1.0.0.2
- Added ability to input a vCenter cluster name during deployment
- 1.0.0.3
- Fixed issue with Chrome adding a Unicode character (<u+200E>) at beginning of Thumbprint when pasted in which would hang appliance at startup.
- Fixed issue when not deploying all View options where those options were still set with invalid values and appliance would hang at startup.
Download VMware Access Point Deployment Utility 1.0.0.3
NO TECHNICAL SUPPORT IS PROVIDED FOR THIS PRODUCT.


Hi,
I was really looking forward to this script but it’s not working for me 😥
When I fill all the fields and “Deploy” it I get an error of the program right away: “Unhandled exception has occured in you application…”. So I clicked on the button “Show OVF Tool String” and used this with the OVFTOOL. The OVFTOOL succesfully deploys VM AP but the “View Settings” are not configured in the VM AP and it starts but won’t run service https (443) and 9443.
I know this because when I’m using the OVFTOOL just with the minimal settings (so no View Settings like External URL for Blast and Accesspoint) it works.
Can anyone help me to fix this? So I want a VM AP with all settings, including the View Settings (External URl’s) configured…
TIA
Pablo
Pablo – can you send me a screenshot of the exception error and your View Settings in the application? Were you setting certs and view or just view? My email is chrisdhalstead@gmail.com. Thanks
Hi Pablo,
I have been hit with this issue today, and resolved the issue. (For me at least) When you copied the Certificate Thumprint (presumably from the properties of the certificate in a browser) did you also copy the prevailing space before the first 0 of the Thumprint? If so, when you copied and pasted the thumbprint into Chris’s deployment tool it looks like it omits the space for you. It’s not until you deploy the appliance it deploys with everything locked down. This is because it’s failed to load the firstboot.properties file as there’s an unexpected set of characters in there (that’s the space that was copied but hidden in the input field)
You can either dig into it by doing “less /opts/VMware/gateway/conf/firstboot.properties” and deleting the 0x203 characters in the certificate Thumprint and reboot. Or re-deploy with omitting the prevailing 0 in your copy and paste job.
Pingback: VMware Access Point | Carl Stalhood
sorry, typo.
*Or re-deploy by omitting the prevailing “space” in your copy and paste job.
Hi all,
I had an issue using this utility on DNS entries.
In entered all the information exaclty as specified and after long hours of investigation I realized DNS resolution was not working at all on the appilance.
DNS IPs that I entered comma separated were not registered properly in /etc/resolv.conf.
the format was :
#nameserver x.x.x.x,y.y.y.y
instead of:
#nameserver x.x.x.x
#nameserver y.y.y.y
so if you use this utillity, I advise you to enter only one DNS IP and thhen adjust those ones manually through the console as root.
Chris thank you very much for this utility, despite this inssue I was able de redeploy around 20 times the appliance during this troubleshooting with fewer effort.
Thanks
I have seen this issue as well. It actually isn’t limited to this utility. The same thing happens when deploying via vCenter, OVFTool manually or through this utility. It appears to be a known issue with Access Point and I will update the post when there is a resolution. In the mean time, I will limit the next version to one DNS entry in the GUI until the issue is resolved.
@ThybCD Thank you, that was the problem here also.
@chrisdhalstead Thank you for this awesome tool.
But I have a question:
I have implemented the certs fine and it looking perfect in the webrowser. But if I open the connection with the Horizon Client on Windows (build 3.5.2) there is still a message, that the connection is not trusted. How can I fix this?
Thanks Simon – Check the Horizon Client cert checking mode. This is under the drop-down menu at the top-right of the client under “Configure SSL”. If it is set to “Do not verify server identity certificates” you will always get the red X, even if it is a valid cert since it isn’t checking it. Make sure it is set to “Warn before connecting to untrusted servers” or “Never connect to untrusted servers” and you should see the green check box.
Thank you Chris, that’s it 🙂
Awesome utility. Thanks.
Just in case someone runs into the same problem as me. When I generated my private key from by PFX file using :
openssl pkcs12 -in mycertchain.pfx -nodes -nocerts -out myprivatekey.pem
it didn’t generate it in the correct format, resulting in the following exception in the admin.log file
ERROR exception.UnmappedExceptionMapper: Unmapped exception
java.lang.ClassCastException: org.bouncycastle.asn1.pkcs.PrivateKeyInfo cannot be cast to java.security.KeyPair
I converted the key to an RSA private key using the following command and everything worked great:
openssl rsa -in myprivatekey.pem -check -out myprivateRSAkey.pem
Thanks Kyle! I will add this to the article
Pingback: Newsletter: December 5, 2015 | Notes from MWhite
Great post, does Access Point work with Cloud Pod Architecture?
Thanks! Access Point is not certified for Cloud Pod yet, as far as I know, but they should work fine together. I will post when AP is certified and supported with CPA