Brain Surgery…one year out

Tomorrow is the one year Anniversary of my Brain Surgery at Johns Hopkins. It’s been a really hard year but I am proud of the progress and adjustments I have made. It’s been quite a ride 😁

I encourage anyone who has similar symptoms to get an MRI.  Acoustic Neuroma is a very slow growing skull base tumor and if caught early enough there are non-surgical options.

Acoustic Neuroma Association

Diagnosis

For the previous several years I out of the blue started getting symptoms of bad panic attacks. Feeling dizzy, like I was going to pass out. I started getting strange ocular migraines as well like lightning bolts in my vision.   The doctors said it was all stress and anxiety and I couldn’t argue with them – I have been through a lot personally and professionally. So I dealt with it – everywhere I went I felt like I could pass out at any time – it became a new normal.

I also had tinnitus for several years, but I blamed myself.  I did a lot of DIY work, and rarely wore ear protection.  One weekend I was doing a lot of work with a gas framing nailer and I had very persistent tinnitus.  I went to ENT and was told it may get better in time.  I noticed that I had slight hearing loss in my right ear – things like not hearing the alarm clock in the morning, but again though it was due to my own negligence.

Until one day in mid July 2018.  I was working at home and my wife Tricia and kids were at Disney World in Florida.  I felt light-headed and laid down for a few minutes as I frequently had to do.  This time, when I got up I looked at my phone and couldn’t put a face to names of colleagues who I had known for years – I didn’t know who they were.  Scared – I tried reading something aloud – my words were slurred and I couldn’t pronounce words properly.  I was having a stroke – or at least that was what I thought.

I called my wife and I said I think I just had a stroke – she was like what?  Not something you expect to hear.  I said I just need to go the hospital and our friend Marie was able to drive to to the Emergency Room at Greater Baltimore Medical Center.  They triaged me and got me right in for a CT scan.  I had multiple other tests on my heart and was in a room in the ER.   By that time, my Parents and my Wife’s parents had arrived.  A bunch of doctors came in and I knew that wasn’t a good sign.

They said well you didn’t have a stroke but you have a very large mass on your brain.  WOW. Not what I expected.   I just remember I broke out crying.   At that point we had no idea if cancerous or not, and I know the prognosis for brain cancer is not good.  I pulled it together and asked for some more details.  They didn’t know much since not a great image with a CT scan – they got me in for a MRI.

I have never had an MRI before, so I had no idea what to expect.  My friend Ted was there and came down to the waiting area with me.  I squeezed into a tiny tube for almost an hour, my mind racing with what was ahead of me.

37mm Acoustic Neuroma brain tumor – pushing on my brain stem and you can see it going into my ear canal.

The MRI confirmed that this was indeed a large brain tumor and they were pretty confident it was an Acoustic Neuroma or Meningioma.  I asked about operating – they weren’t sure because it was displacing my brainstem by 2-3mm and was near a large artery.  I would need to go to a tertiary surgical hospital that specializes in brain surgery.  It was all a bit unreal. My wife Tricia and the kids flew back that night from Florida.

Planning

I live in Baltimore and very close to one of the best hospitals in the world–Johns Hopkins.   My wife called them the following Monday and sent over my MRI.  They called back that they thought it was an Acoustic Neuroma and they would determine who would be best for my surgery.   A week or so later they called and said Dr. Rafael Tamargo would be doing the surgery and the first availability was October 16.   I couldn’t believe it was so far out, but in reading about the tumor they grow very slowly.  I researched Dr. Tamargo and he seemed like an amazing person and surgeon.  That helped.

I met Dr. Tamargo in August and he looked at my MRI again.  He said my tumor was classified as “giant”, which scared me a bit.  But large tumors were something he was familiar with.  He explained the process and told me in no uncertain terms that recovery was going to be very difficult.  He explained how the tumor grows on the right side balance nerve and they had to remove it.  He told me I would lose the hearing in my right ear permanently.  That was the hardest and scariest thing of all.   He also said, depending on how “sticky” the tumor is I may have temporary or permanent facial paralysis.  He was awesome – I felt good about that aspect at least.

The next couple of months were kind of a blur.  It is scary to know for a fact you are going in for major brain surgery and that you will lose hearing, a balance nerve and your face will be affected.

Surgery – well the first

October 16, 2018 finally rolled around and at this point I was ready for the surgery.  They prepped me with a couple IV’s and an A-Line which is a larger IV directly into an artery to monitor your heart rate in real time – that thing hurt.

I said goodbye to my wife and parents and laid on the gurney.   I knew it was my last time hearing out of the right side so I tried to focus on that one more time.  I was talking to one of the anesthesiologist and he wheeled my into this huge operating room with two large TV’s with images from my MRI.  There were probably 10 people already in the room – they moved me over to the operating table.  I remember all of the cold gel packs on the table.  Well – this is it.  I went out.

13 hours later I felt like I was dreaming and I heard Dr. Tamargo calling to me.  “Chris….Chris…we got it all, it was what we thought.  It was benign and I saved your facial nerve”.  Great news!

They wheeled me into the Intensive Care unit and I saw Tricia, Ted and my Parents (well I heard them I couldn’t see anything).   I remember my friend Ted went over to my right side and almost passed out – the scar was huge and there was blood everywhere.   They left for the night and the next two day were surreel.   I don’t remember much – I just had horrible vertigo from the right side balance nerve being cut and my head was just ringing.   The room was just spinning and I couldn’t get comfortable no matter what.

Two days after the first surgery

The right side of my face was totally paralyzed which made eating or talking nearly impossible.  My right thumb also had no feeling and my right side was extremely weak.  I couldn’t use a spoon or sign my name as I found out before a post-op MRI.   Since my right eye wasn’t closing properly they put a 3gm platinum weight in my eyelid – this was my first experience with Dr. Boahene – an amazing plastic surgeon.

I was in the hospital just about a week, working on learning to walk again and doing other vestibular exercises to get the left side balance nerve to compensate for the now missing right side nerve. I just wanted to go home though.

Going home!  Shirt my friend Marie made for me

Second Surgery

Being home was not easy.  I couldn’t go anywhere or do anything without Tricia’s help and my neck was so stiff I could really only look straight ahead.   I couldn’t sleep.  Then Tricia noticed something odd about my incision.  It was leaking fluid.  We called and got right into the ER at John Hopkins.   My sodium level was very low so they moved me into the Intensive Care unit.   I had another MRI and Dr. Tamargo was quite certain that I had a CSF (Cranial Spinal Fluid) leak and possibly an infection.  They need to re-open the incision and see what was going on.   But they needed to get my sodium level back up first.

On Halloween 2018 I was scheduled for surgery.   I went in that afternoon into a much smaller operating room.  I woke up a couple hours later and Dr. Tamargo told me it was one stitch that was leaking on the dura and they got it.  I have heard that stiching the dura of the brain is like stitching together saran wrap.  They did have to remove the titanium plate I had initially over the hole in my skull because of infection worries.    I actually felt ok after that surgery and my neck felt much better without several pints of CSF fluid hanging out.   I stayed in intensive care for a few more days on a IV cocktail of the most powerful antibiotics that Johns Hopkins has.    I started feeling a little better, considering.

After the second surgery

Recovery

Back Home

I was in the hospital for about another week (antibiotics, blood transfusion) but overall feeling much better.  I was starting to walk around the hallway with Tricia’s help and just ready to go home.    I went home and started working on recovery – it all was so hard and took time.  My face was still totally paralyzed for about 6 months, then we saw a small twinge in my cheek!

Basketball game 4 months after surgery with my friend Stephane

It continued to improve and I got cros hearing aids to help me when at work events.  They are pretty amazing.   The right side is just a microphone and it transmits wirelessly to my good ear so I can hear in very loud environments.  Otherwise it just sounds like a bunch of noise.   Today I am 1 year post op.   I had my 1 year MRI and everything looks great.  I still have some facial paralysis, but I do exercises and I hope it will fully come back.   Dr. Tamargo said it could take up to two years – he is confident it will all come back in time.

11 months post op at a Football game with my friend Ted

I am thankful to be where I am today.  I couldn’t have done it without my wife Tricia, my family and my amazing colleagues and friends.    I am thankful to have had such a great surgical team at Johns Hopkins – Dr. Tamargo, Dr. Chien, Dr Boahene and all of the wonderful nurses and support staff.

Posted in Horizon View Utilities | Leave a comment

VMware App Volumes API Reference

**NOTE:  The App Volumes API is NOT Officially Supported by VMware**

VMware App Volumes has a fully featured REST API that can be used to automate any function that can be done from within the App Volumes manager. A REST API uses the standard HTTP protocol and Verbs to retrieve or set data.

The input parameters, which are posted to the REST API and the data returned are formatted as JSON.   Note: A user must be defined as an App Volumes Administrator in order to use the API

In order to set and retrieve data to the API you need to have a client, which is capable of sending and retrieving data using HTTP / URL syntax.   There are many that are available for free. I will focus on cURL and Postman in this article.  I have also written a few applications in VB.net using the App Volumes API.  I will post some sample code for .NET in a future post.   The API wasn’t really documented so I decided to put this post together to help others who may want to program against the API.

Clients for REST API

As mentioned, there are several ways to connect and retrieve data from the App Volumes API.   Here are a couple of the most popular:

cURL

cURL is a command line data transfer utility for protocols using the URL syntax.     It can be downloaded for free for most operating systems. I will provide some sample syntax for cURL in the next section.

Google Postman

Google offers an add-on for the Chrome browser called Postman. This is the client I prefer for quickly checking the API syntax and returning data. It is easy to use, and returns the nicely formatted JSON data.   Postman can be easily added to any instance of the chrome browser and accessed from the Chrome App Launcher. You will also need to install the Postman Interceptor extension for Postman to be able to read and save browser-based cookies, which is where the session for the API connection will be saved.

Connecting to the App Volumes API

We will now use the Postman REST API and cURL clients to connect to App Volumes and create a session.   App Volumes stores the session data in a cookie.  Once we have that session cookie, we can reference it to pull other data from the API. We can log in one time, and as long as our session doesn’t time out, we can continue to use the API.

cURL

With cURL we will establish a connection to the API and save the session cookie to a text file. We can then reference the cookie text file when we want to do additional actions against the API

Login to API and save the session Cookie:

curl -c cookies.txt -H “Content-Type: application/json” -X POST -d ‘{“username”:”avuser”,”password”:”password”}’ http://192.168.1.25/cv_api/sessions

Screen Shot 2015-12-29 at 9.50.05 AMWhen you successfully log into the API you will receive the following JSON message:

{“success”:”Ok”}

If you look at the cookie file that is created, we can see that it contains a _session_id value. This is the session cookie.

Screen Shot 2015-12-29 at 9.52.51 AM

We can now run additional commands and reference the cookie we saved:

Return Writable Volumes and format the JSON to make it easier to read. Notice we are referencing the cookies.txt file we created when we logged in. Note: The | python –m json.tool is optional and just helps format the returned JSON data to make it easier to read.

curl -b cookies.txt -H “Content-Type: application/json” -X GET http://192.168.1.25/cv_api/writables | python -m json.tool

Screen Shot 2015-12-29 at 9.44.33 AM

Google Postman

  • Launch the Postman client do the following to create a session:
    • Make sure that the Postman Interceptor add in is installed to handle cookies
    • Make sure the Verb is set to POST
    • Type http://<app_volumes manager>/cv_api/sessions in the address bar
    • Click Body, select form-data
      • Enter a Key called username with the username of an App Volumes Administrator
      • Enter a Key called password with the password associated with this account
      • Hit Send to make the connection – if successfully authenticated you will see   “success”: “Ok” in the return data of the body.

Screen Shot 2015-12-28 at 8.28.21 AM

You have successfully authenticated to the App Volumes API.   If you click the cookies tab, you will notice you have been issued a session cookie. This will be passed back to the App Volumes manager API each time you attempt to connect. As long as the session is still valid, you won’t be prompted for Authentication.

Screen Shot 2015-12-28 at 8.28.33 AM.png

If your session times out, you will receive a message similar to the one below, just post back to the API to establish another session as we did earlier.

Screen Shot 2015-12-30 at 8.56.25 AM

Issues Logging In

You may receive the following error messages when attempting to log in to the App Volumes API:

Invalid username or password – make sure the username (domain\username) and the password are correct and try again.

Screen Shot 2015-12-30 at 9.07.52 AM

You must be in the Administrators group to Login

If you receive the message below, the account that you are attempting to log in with is not a member of the group defined as App Volumes Administrators

Screen Shot 2015-12-30 at 9.10.41 AM

You can check what group is defined as the App Volumes Administrators group by logging into the App Volumes Manager and browsing to “Configuration” | “Administrators”. Make sure the account you are using to access the API is a member of this group and try connecting again.

Screen Shot 2015-12-30 at 9.24.44 AM

Let’s start using the App Volumes API. I will break out the API calls as they are arranged in the App Volumes manager today. The same URL paths and verbs will work for either Postman or cURL. I will be using Postman in my examples as I find it easier to use.

General App Volumes API Calls

In this section we will cover API commands to retrieve general data from App Volumes.

Get App Volumes Version Information:

Verb: Get

URL: http:///cv_api/version

Screen Shot 2015-12-28 at 8.47.08 AM

Get App Volumes License Information:

Verb: Get

URL: http:///cv_api/license

Screen Shot 2015-12-28 at 8.50.42 AM

Get App Volumes License Usage Information:

Verb: Get

URL: http:///cv_api/license_usage

Screen Shot 2015-12-28 at 8.54.31 AM

Get Active Directory Settings:

Verb: Get

URL: http:///cv_api/ad_settings

Screen Shot 2015-12-28 at 9.54.39 AM

Get Current Administrator Group for the App Volumes Manager:

Verb: Get

URL: http:///cv_api/administrator

Screen Shot 2015-12-28 at 9.57.50 AM

Get Machine Managers:

Verb: Get

URL: http:///cv_api/machine_managers

Screen Shot 2015-12-28 at 10.02.05 AM

Get Machine Manager Detailed Configuration:
You will need to note the “id” of the machine manager you want to return more information for.

Verb: Get

URL: http:///cv_api/machine_managers/id

Screen Shot 2015-12-28 at 10.42.42 AM

Get Storage Options:
This will show the paths of where the AppStacks, Writables and Templates are stored and some basic information on the datastores.

Verb: Get

URL: http:///cv_api/datastores

Screen Shot 2015-12-28 at 10.46.21 AM

AppStack / Writable Volume API Calls

Get a list of AppStacks:

Verb: Get

URL: http:///cv_api/appstacks

Screen Shot 2015-12-28 at 10.51.40 AM

Get detailed AppStack Information:
You will need to note the “id” of the AppStack you want to return additional data for.

Verb: Get

URL: http:///cv_api/appstacks/id

Screen Shot 2015-12-28 at 10.54.40 AM

Get applications installed in an AppStack:

Verb: Get

URL: http:///cv_api/appstacks//applications

Screen Shot 2015-12-28 at 10.59.18 AM
Get file locations for an AppStack:
This will show all of the data store locations for an AppStack if you are using a Storage Group.

Verb: Get

URL: http://<App_Volumes_Manager/cv_api/appstacks/id/files

Screen Shot 2015-12-28 at 11.03.49 AM

Get current assignments for an AppStack:

Verb: Get

URL: http:///cv_api/appstacks/id/assignments

Screen Shot 2015-12-28 at 11.06.50 AM

Get current attachments for an AppStack:

Verb: Get

URL: http:///cv_api/appstacks/id/attachments

Screen Shot 2015-12-28 at 11.07.00 AM

List Writable Volumes:

Verb: Get

URL: http:///cv_api/writables

Screen Shot 2015-12-28 at 11.13.20 AM
Get detailed information for a Writable Volume:

Verb: Get

URL: http:///cv_api/writables/id 

Screen Shot 2015-12-28 at 11.15.11 AM

Disable Writable Volume:

Verb: Post

URL:
http:///cv_api/writables/disable?volumes%5B%5D=id

Screen Shot 2015-12-29 at 5.53.28 PM

Enable Writable Volume:

Verb: Post

URL:
http:///cv_api/writables/enable?volumes%5B%5D=id

Screen Shot 2015-12-29 at 5.50.57 PM
Get Current Attachments:

Verb: Get

URL: http:///cv_api/attachments

Screen Shot 2015-12-29 at 4.50.26 PM

Get Current Assignments:

Verb: Get

URL: http:///cv_api/assignments

 Screen Shot 2015-12-29 at 4.52.26 PM

Assign an AppStack to a Computer:

Verb: Post

Parameters:

action_type=Assign

id=1 (this is the AppStack ID)

assignments[0][entity_type]= Computer

assignments[0][path]=CN=HOMEWIN7,CN=Computers,DC=halstead,DC=net

mount_prefix=(optional parameter)

rtime= false (true mount immediately, false mount at next login)

URL: http:///cv_api/assignments?action_type=Assign&id=1&assignments%5B0%5D%5Bentity_type%5D=Computer&assignments%5B0%5D%5Bpath%5D=CN%3DHOMEWIN7%2CCN%3DComputers%2CDC%3Dhalstead%2CDC%3Dnet&rtime=false&mount_prefix=

Screen Shot 2015-12-29 at 5.58.25 PM

Assign an AppStack to a User, Group or OU:

Verb: Post

Parameters:

action_type=Assign

id=1 (this is the AppStack ID)

assignments[0][entity_type]= User

assignments[0][path]=CN=Brady,OU=Home_Users,DC=halstead,DC=net

mount_prefix=(optional parameter)

rtime= true (true mount immediately, false mount at next login)

URL: http:///cv_api/assignments?action_type=Assign&id=1&assignments%5B0%5D%5Bentity_type%5D=Computer&assignments%5B0%5D%5Bpath%5D=CN%3DHOMEWIN7%2CCN%3DComputers%2CDC%3Dhalstead%2CDC%3Dnet&rtime=false&mount_prefix=

Screen Shot 2015-12-29 at 6.11.20 PM

Unassign an AppStack:

Verb: Post

Parameters:

action_type=Unassign

id=1 (this is the AppStack ID)

assignments[0][entity_type]= User or Computer

assignments[0][path]=CN=Brady,OU=Home_Users,DC=halstead,DC=net

mount_prefix=(optional parameter)

rtime= true (true mount immediately, false mount at next login)

URL: http:///cv_api/action_type=Unassign&id=1&assignments%5B0%5D%5Bentity_type%5D=User&assignments%5B0%5D%5Bpath%5D=CN%3DBrady

%2COU%3DHome_Users%2CDC%3Dhalstead%2CDC%3Dnet&assignments%5B0%5D%5Bid%5D=2&rtime=true&mount_prefix=

Screen Shot 2015-12-29 at 6.17.25 PM

Get a list of all applications contained in all defined AppStacks:

Verb: Get

URL: http:///cv_api/applications

Screen Shot 2015-12-29 at 4.54.16 PM
Get detailed information on an Application:
You will need to note the “id” of the Application you want more data on.

Verb: Get

URL: http:///cv_api/applications/id

Screen Shot 2015-12-29 at 4.56.18 PM

 App Volumes Directory API Calls

Get a list of all online entities:

Verb: Get

URL: http:///cv_api/online_entities

Screen Shot 2015-12-29 at 5.01.42 PM

Get a list of all users who have logged into a managed computer or have had a volume assigned to them:

Verb: Get

URL: http:///cv_api/users

Screen Shot 2015-12-29 at 5.03.32 PM

Get a list of all computers that have reported with an App Volumes Agent:

Verb: Get

URL: http:///cv_api/computers

Screen Shot 2015-12-30 at 10.28.24 AM

Get a list of all groups that have been assigned an AppStack

Verb: Get

URL: http:///cv_api/groups

Screen Shot 2015-12-29 at 5.07.43 PM

Get a list of all AD OUs that have been assigned an AppStack:

Verb: Get

URL: http:///cv_api/org_units

Screen Shot 2015-12-29 at 5.11.03 PM

App Volumes Infrastructure API Calls

Get a list of all machines that have been seen by this App Volumes Manager:

Verb: Get

URL: http:///cv_api/machines

Screen Shot 2015-12-30 at 10.33.45 AM

Get a list of all storage locations seen by this App Volumes Manager:

Verb: Get

URL: http:///cv_api/storages

Screen Shot 2015-12-30 at 10.35.20 AM

Get a list of all Storage Groups:

Verb: Get

URL: http:///cv_api/storage_groups

Screen Shot 2015-12-30 at 10.36.45 AM

Get detailed information for a Storage Group:
You will need to note the “id” of the Storage Group you want more data for.

Verb: Get
URL: http:///cv_api/storage_groups/id

Screen Shot 2015-12-30 at 10.37.38 AM

Force Replication for a Storage Group:

Verb: Post
URL: http:///cv_api/storage_groups/id/replicate

Screen Shot 2015-12-30 at 10.38.47 AM 
Import Volumes into a Storage Group:

Verb: Post
URL: http:///cv_api/storage_groups/id/import

Screen Shot 2015-12-30 at 10.40.00 AM.png
App Volumes Activity API Calls

Show Pending Actions:

Verb: Get
URL: http:///cv_api/pending_activities

Screen Shot 2015-12-30 at 10.41.23 AM.png

Return Activity Log:

Verb: Get
URL: http:///cv_api/activity_logs

Screen Shot 2015-12-30 at 10.42.15 AM.png

Show System Messages:

Verb: Get
URL: http:///cv_api/system_messages

Screen Shot 2015-12-30 at 10.43.24 AM
Show Server Logs from App Volumes Manager:

Verb: Get
URL: http:/// activity/server_tail

Screen Shot 2015-12-30 at 10.44.39 AM.png

Hopefully this post was helpful in understanding how the App Volumes API is constructed.  Please let me know if you have any questions.

Additional API Calls

Create an AppStack:

Verb – POST

URL – https://cv_api/appstacks

Parameters:

bg

1

datacenter

Home

datastore

SSD1|Home|1

description

name

NewAppstack

parent_appstack_id

path

cloudvolumes211/apps

template_name

template.vmdk

template_path

cloudvolumes211/apps_templates

Watch the Job process:

Verb – GET 

URL – https://cv_api/jobs/pending

Make sure the job is complete

{

  “pending”: 0,

  “error”: 0

}

Get ID of the AppStack that was just created.

Verb – GET

URL – https://cv_api/appstacks

{

    “id”: 8,

    “name”: “NewAppstack”,

    “name_html”: “NewAppstack”,

    “path”: “cloudvolumes211/apps”,

    “datastore_name”: “SSD1”,

    “status”: “provisioning”,

    “created_at”: “2016-05-13 08:41:38 -0400”,

    “created_at_human”: “May 13 2016”,

    “mounted_at”: “2016-05-13 08:45:53 -0400”,

    “mounted_at_human”: “May 13 2016”,

    “mount_count”: 0,

    “size_mb”: null,

    “template_version”: null,

    “assignments_total”: 0,

    “attachments_total”: 1

  },

Query Desktops capable of provisioning and choose a system:

Verb – GET

URL – https://cv_api/provisioners

Make sure system is Available and capture the uuid and computer id:

{

  “provisioners”: [

    {

      “upn”: “HALSTEAD\\AV211-IC-2$”,

      “status”: “Available”,

      “id”: “6”,

      “name”: “HALSTEAD\\AV211-IC-2$”,

      “link”: “/directory#/Computers/6”,

      “uuid”: “5009e3d5-7d59-da85-eeab-4ffe2d31e40a”,

      “selectable”: true,

      “created_at”: “2016-05-07 22:38:09 UTC”,

      “created_at_human”: “May 07 2016”

    },

    {

      “upn”: “HALSTEAD\\H7-MASTER$”,

      “status”: “Powered Off”,

      “id”: “1”,

      “name”: “HALSTEAD\\H7-MASTER$”,

      “link”: “/directory#/Computers/1”,

      “uuid”: “50097949-d73d-0804-2bcb-18cc9b23c541”,

      “selectable”: false,

      “created_at”: “2016-05-07 13:40:10 UTC”,

      “created_at_human”: “May 07 2016”

    },

Start Provisioning:

Verb – POST

URL – https://cv_api/provisions/start

Parameters:

computer_id

 6

uuid

 5009e3d5-7d59-da85-eeab-4ffe2d31e40a

*Install Applications on Provisioning System*

Finish Provisioning:

Verb – POST

URL – https://cv_api/provisions/complete

Cancel Provisioning:

POST to:  https://cv_api/provisions/stop

Posted in App Volumes, Coding | 8 Comments

VMware Access Point Deployment Utility

Overview

VMware recently released the Access Point solution, which is a secure gateway for Horizon 6.   The solution is deployed as a Linux based Virtual Appliance with a REST based API for querying and updating the appliance. It is deployed as an OVA, which can be done in a couple of ways.  You can deploy it via vCenter with the “Deploy OVF Template” wizard or with the VMware OVF tool.  The OVF tool is the preferred method as all of the API parameters to configure View and Certificates can be passed as a JSON string into the OVF tool.  The issue is that it is command line based and the input string can become very complicated and hard to properly construct.   Below is a sample OVF Tool Input string to deploy an Access Point appliance:

Sample OVF Tool Input String:Screen Shot 2015-11-17 at 12.28.18 PM

As you can see, it can be a very difficult string to construct properly.  In addition, if you are updating the certificates for the appliance, the PEM files must be formatted into a single line string with appropriate embedded newline characters.  This can all be very challenging and intimidating when attempting to deploy Access Point.

That is why I wrote this utility.  It basically acts as a GUI wrapper for the OVF tool and will construct a proper OVF Tool input string including all of the JSON to be passed to the Access Point API.

VMware Access Point

Access Point has been covered in other articles.  I am not going to cover much on Access Point in general other than what is below:

From the Deploying and Configuring Access Point Document:

Access Point functions as a secure gateway for users who want to access Horizon 6 desktops and applications from outside the corporate firewall.

Access Point appliances typically reside within a DMZ and act as a proxy host for connections inside your company’s trusted network. This design provides an additional layer of security by shielding View virtual desktops, application hosts, and View Connection Server instances from the public-facing Internet. Access Point directs authentication requests to the appropriate server and discards any un-authenticated request. The only remote desktop and application traffic that can enter the corporate data center is traffic on behalf of a strongly authenticated user. Users can access only the resources that they are authorized to access.

Access Point appliances fulfill the same role that was previously played by View security servers, but Access Point provides additional benefits:

  • An Access Point appliance can be configured to point to either a View Connection Server instance or a load balancer that fronts a group of View Connection Server instances. This design means that you can combine remote and local traffic.
  • Configuration of Access Point is independent of View Connection Server instances. Unlike with security servers, no pairing password is required to pair each security server with a single View Connection Server instance.
  •  Access Point appliances are deployed as hardened virtual appliances, which are based on a Linux appliance that has been customized to provide secure access. Extraneous modules have been removed to reduce potential threat access.
  • Access Point uses a standard HTTP(S) protocol for communication with View Connection Server. JMS, IPsec, and AJP13 are not used.

My colleague Mark Richards has also written a great article, with a very detailed overview of Access Point, along with how deployment works with the OVF Tool and using the API.

https://virtualmarkr.wordpress.com/2015/09/10/vmware-euc-access-point-what-is-it-and-how-to-get-it-to-work/

Access Point Deployment Utility

Pre-requisites:

Microsoft .NET Framework 4.5
VMware OVF Tool 4.1 –  Download

How it works: 

As mentioned earlier this utility is a wrapper for the VMware OVF Tool.  It allows you to input settings in a GUI and it will create the properly formatted input string for you.  It also allows settings to be saved to an XML file and later imported to reduce how much data needs to be manually entered.  It will also take a standard PEM certificate chain and private key and convert them to the proper format.

When you first start the application it reads the registry to see if the VMware OVF tool is installed and it reads where the tool is currently installed.  If it is not detected, you will see the message below and you will need to install the OVF Tool to continue.

Screen Shot 2015-11-17 at 2.22.46 PM

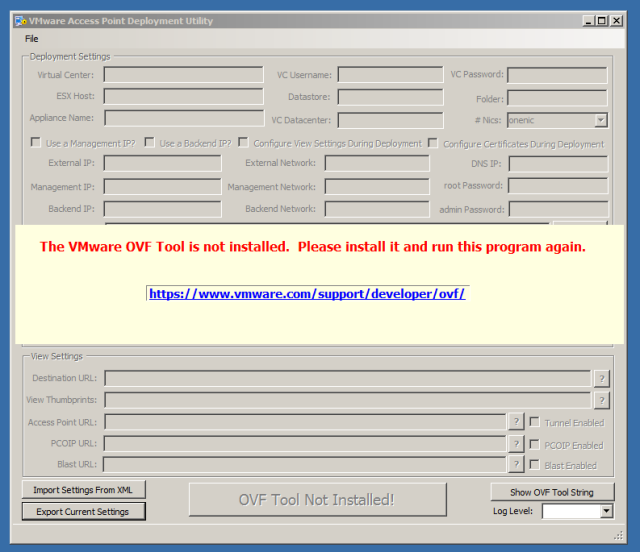
Once the OVF Tool is installed and detected you will see the following:

Screen Shot 2015-11-23 at 1.49.04 PM.png

If you have previously exported settings, you can import them to populate the form by choosing “Import Settings from XML” and browsing to an export file.  This is a quick way to import your settings for redeployment. The only settings that aren’t saved are passwords.

Configuration and Deployment

Let’s assume you don’t have any settings exported and you are running the application for the first time.  We will go through all of the parameters and provide information on what they are and how they should be formatted.

Deployment Settings

Screen Shot 2015-11-23 at 1.48.11 PMThese are the basic settings required to deploy the Access Point appliance.  Let’s go through each of them now.

Note: The OVF Tool is case sensitive for some of the objects in the vCenter locator string.  Those entries are called out below

Note that each setting has a Screen Shot 2015-11-18 at 8.47.04 AM button that will show example format.

Virtual Center:  This is the FQDN or IP address of the Virtual Center you want to deploy the appliance into.  Example:  192.168.1.12
This setting is case sensitive!

VC Username:  User that has access to deploy a Virtual Appliance in the Virtual Center you are targeting for deployment.  This should be in the format user@domain.com.  Example:  chris@halstead.net or administrator@vsphere.local

VC Password:  The password for the user you specified in the previous step.

ESX Host:  The FQDN or IP of the ESX host where the appliance will be deployed.  It must reside in the Virtual Center you specified earlier. Example:  esxhost.company.com or 192.168.1.11
This setting is case sensitive!

Datastore: The datastore as defined in Virtual Center  / vSphere that you want to place the appliance on.  Example:  VMFS_1

Folder: The folder you want to place the appliance in.  This is optional and can be left blank or set to “/”.  Example:  External
This setting is case sensitive!

Appliance Name:  The name of the Access Point appliance once it is deployed:  Example:  AP_PROD

VC Datacenter:  The name of the Virtual Center datacenter you want to deploy this appliance to.  Remember, you must have IP Pools defined for this datacenter with the network(s) you plan to use.  Example:  Home
This setting is case sensitive

Cluster Name:  The name of the cluster in which the ESX host you are deploying to resides.  If you are using clusters in your environment you must enter the cluster name.   This is an optional field, and if not using a cluster it must be left blank. If you are using clusters in your environment it is a required field.   Example:  Prod Cluster
This setting is case sensitive!

#nics:  How many nics are defined for the virtual appliance.   If one, external, management and back-end traffic flows over the one nic.  If two nics are configured, external has a dedicated nic and management and back-end traffic travel over the second nic.   If three nics are defined, external traffic, management traffic and back-end traffic each have their own nic.  Example:  onenic

Use a management IP?: This option is automatically selected if using two or three nics.

Use a back-end IP?:  This option is automatically selected when using three nics.

Configure View Settings During Deployment:  Checking this box will enable the panel containing View Settings which will be passed into the appliance API via JSON and set during deployment.

Configure Certificates During Deployment: Checking this box will enable the panel containing certificate settings which will be passed into the appliance API via JSON and set during deployment.

External IP:  IP address of the Virtual Appliance.  Example: 192.168.1.50

External Network:  The network label as defined in Virtual Center / vSphere for the port group you want to assign to the external interface.  If using just one nic, this will be used by management and back-end traffic as well.

DNS IP:  Single DNS Server*
Example:  192.168.1.199
*Note:  Access Point is not properly accepting multiple DNS entries (event when deployed via vCenter).   In SUSE,  multiple DNS entries should be placed on separate “nameserver” lines and they are being placed on a single line. This is a known issue and at this time you must use a single DNS IP Address.  This will be fixed in a future release of Access Point.

Management IP:  IP address that will be bound to the management network if using two or three nics.  Example: 192.168.1.51

Management Network:  The network label as defined in Virtual Center / vSphere for the port group you want to assign to the management interface.  If using two nics, this will be used by management and back-end traffic.

Back-End IP:  address that will be bound to the back-end network if using three nics.  Example: 192.168.1.52

Back-End Network:  The network label as defined in Virtual Center / vSphere for the port group you want to assign to the back-end interface.

root password:  Password used when connecting via console to the Access Point appliance.   This must be a valid linux password.  Example:  VMware1

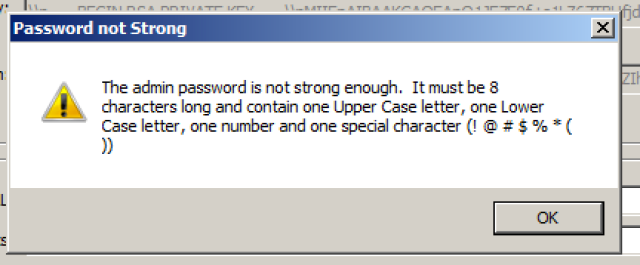
Admin password:  Password used to connect to the REST API.  This password must be 8 characters long and contain at least one each of the following:  upper case letter, lower case letter, number and special character  ! @ # $ % * ( )    Example: VMware1!

Path to OVA:  This is the path to the OVA for VMware Access Point.  You can type in the path or click the … button and browse to the file.  Example:\\192.168.1.17\software\Deploy Access Point GUI\euc-access-point-2.0.0.0-2939373_OVF10.ova 

At this point, all of the required fields to deploy are complete, but let’s walk through the process of configuring settings for Certificates and View before we deploy.

Certificate Settings

Certificates can also be configured at deployment.   This is very important as the Access Point appliance is sitting in the DMZ and acts as a secure gateway for View.

Certificates can be set by selecting the checkbox “Configure Certificates During Deployment”.  This will enable the certificates panel.

The certificate input boxes also have a Screen Shot 2015-11-18 at 8.47.04 AM button which will show proper format.

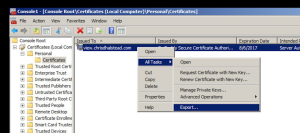
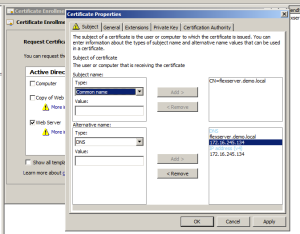
The first thing you need to do is, to export the certificate you want to use for Access Point.  In my case, it was the certificate I had on my View Security Server.  

  1. Select the certificate you want to place on the Access Point appliance and choose “Export”
    Screen Shot 2015-11-20 at 8.50.30 AM
  2. Choose “Yes, export the private key”
    Screen Shot 2015-11-20 at 8.52.39 AM
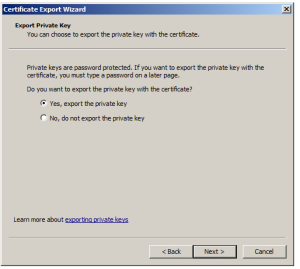
  3. Select “Export all certificates in the certification path if possible”.  This will make sure that any appropriate intermediate and root CA’s are exported.  Create a password for the private key and save the exported certificate.

Screen Shot 2015-11-20 at 8.52.49 AM

Once you have the exported certificate, use OpenSSL to convert the certificate to a PEM certificate chain and private key by running the following commands.

openssl pkcs12 -in mycertchain.pfx -nokeys -out mycertchain.pem
openssl pkcs12 -in mycertchain.pfx -nodes -nocerts -out myprivatekey.pem

This will create two PEM certificate files, one for the Private Key and one for the Certificate Chain.  Once you have them in PEM format, you need to make sure that the private key is formatted like the example below:

—–BEGIN RSA PRIVATE KEY—–
Private Key data
—–END RSA PRIVATE KEY—–

The certificate chain must be in format of Target Certificate, Intermediate, Root, and must be formatted like the example below:

—–BEGIN CERTIFICATE—–
Target Certificate Data
—–END CERTIFICATE—–
—–BEGIN CERTIFICATE—–
Intermediate Certificate Data
—–END CERTIFICATE—–
—–BEGIN CERTIFICATE—–
Root Certificate Data
—–END CERTIFICATE—–

The certificates for Access Point are set via the API using JSON, so the certificate data must be formatted as a single line string with embedded newline characters.  This can be a bit of a pain to do, so the application will format the certificates for you.  You just need to have a properly formatted PEM private key and certificate chain.  You copy them into the appropriate text boxes, and choose “Format Private Key” and “Format Certificates”

Before Formatting:
Screen Shot 2015-11-18 at 8.53.32 AM

After Formatting:
Screen Shot 2015-11-18 at 8.55.16 AM

If you need to modify the Private Key or Certificate chain, simply click the “Update Private Key” or “Update Certificates” button and it will clear out the box so you can paste in a new string.

This process will update the certificate on the Access Point appliance when you deploy it.   This is much easier than having to go back in later and set it via the API.

View Settings

The primary use case for the Access Point appliance is access View desktops and applications.   You can set all of the View configurations at deployment by selecting the “Configure View Settings During Deployment” checkbox and entering the proper information.

Screen Shot 2015-11-18 at 8.58.22 AM

Existing View Connection Servers must be configured properly before using Access Point for secure external connections.    From the “Configuring and Deploying Access Point” document:

Preparing View Connection Server for Use with Access Point

Administrators must perform specific tasks to ensure that View Connection Server works correctly with Access Point.

  • If you plan to use a secure tunnel connection for client devices, disable the secure tunnel for View Connection Server. In View Administrator, go to the Edit View Connection Server Settings dialog box and deselect the check box called Use secure tunnel connection to machine. By default, the secure tunnel is enabled on the Access Point appliance.
  •  Disable the PCoIP secure gateway for View Connection Server. In View Administrator, go to the Edit View Connection Server Settings dialog box and deselect the check box called Use PCoIP Secure Gateway for PCoIP connections to machine. By default, the PCoIP secure gateway is enabled on the Access Point appliance.
  • Disable the Blast secure gateway for View Connection Server. In View Administrator, go to the Edit View Connection Server Settings dialog box and deselect the check box called Use Blast Secure Gateway for HTML Access to machine. By default, the Blast secure gateway is enabled on the Access Point appliance.
  • To use two-factor authentication with Horizon Client, such as RSA SecurID or RADIUS authentication, you must enable this feature on View Connection Server. See the topics about two-factor authentication in the View Administration document.

One you have these pre-requisites in place, you can deploy an Access Point appliance with View settings by providing in the following information in the application:

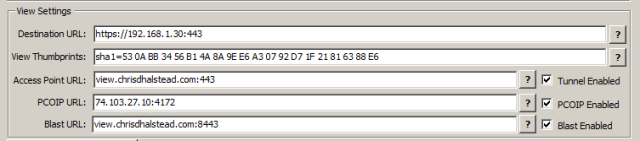
Destination URL:  URL of a View connection server, or the address of a load balancer in front of View Connection servers.  This URL must contain the protocol, FQDN or IP and port.  example:  https://192.168.1.30:443

View Thumbprints: Specifies a list of View Connection Server thumbprints. If you do not provide a comma separated list of thumbprints, the server certificates must be issued by a trusted CA. The format includes the algorithm (sha1 or md5) and the hexadecimal thumbprint digits.  To find these properties, browse to the View Connection Server, click the lock icon in the address bar, and view the certificate details.

Note:  The appliance will accept the the space delimited format from Chrome or the colon separated format from Firefox.Screen Shot 2015-11-18 at 9.21.50 AM

example: sha1=b6 77 dc 9c 19 94 2e f1 78 f0 ad 4b ec 85 d1 7a f8 8b dc 34 or
sha1=53:0A:BB:34:56:B1:4A:8A:9E:E6:A3:07:92:D7:1F:21:81:63:88:E6

NOTE – sha1 or md5 MUST be lower case!

Tunnel Enabled Checkbox:   Specifies whether the View secure channel is enabled

Access Point URL:  The external URL to be used by clients to connect to the Access Point appliance to tunnel secure connections.  Example:  view.chrisdhalstead.com:443
NOTE:  Do NOT start this URL with https://

Enable PCOIP Checkbox:  Specifies if the PCOIP Secure gateway is enabled

PCOIP URL:  The external IP of the Access Point appliance which will be used as the PCOIP secure gateway.   This should ONLY be an IP address and the port for PCOIP.  Example: 68.134.246.117:4172

Blast Enabled Checkbox: Specifies if the Blast Secure gateway is enabled

Blast URL:  Specifies an external URL of the Access Point appliance, which allows end users to make secure connections through the Blast Secure Gateway. Example:  view.chrisdhalstead.com:8443
NOTE:  Do NOT start this URL with https://

Deploy an Access Point Appliance

Back up settings

Now that all of the appropriate settings for deploying an Access Point appliance are in place, this is a good time to export out the settings that you have entered.   Click the “Export Current Settings” button at the bottom left of the form and select a location to save the settings to.

Screen Shot 2015-11-20 at 11.52.11 AM

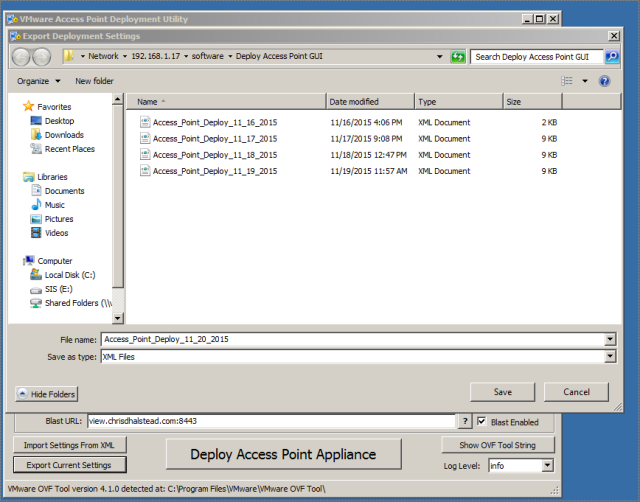
This will create an XML document with the values you had entered (with the exception of passwords) so they can easily be imported at a later date when deploying additional appliances.

Screen Shot 2015-11-20 at 11.54.33 AM.png

Prior to deploying the appliance, or for troubleshooting, the generated input string can be shown and copied out at any time by clicking the “Show OVF Tool String” button on the bottom right of the form.

Screen Shot 2015-11-20 at 11.59.07 AM.png

This string can be copied directly into the command line after the ovftool.exe for troubleshooting.

Deploy the Access Point Appliance

Once all of the settings are in place, you are ready to deploy the appliance.

Log Level:  The ovftool log level can be adjusted prior to deployment by selecting the log level at the bottom right of the form.

Click the “Deploy Access Point Appliance” button when you are ready to deploy.  There is a lot of validation that happens before the appliance is actually deployed, so if any fields are mis-formatted or missing you may receive a message similar to the one below:

Screen Shot 2015-11-20 at 12.05.06 PM

The final check is for the password strength of the Admin account.  This account is used by the REST API service and if the password is not set properly the appliance will not be functional.    If the password is not set to the proper strength (detailed above) you will receive the following message:

Screen Shot 2015-11-20 at 12.09.43 PM

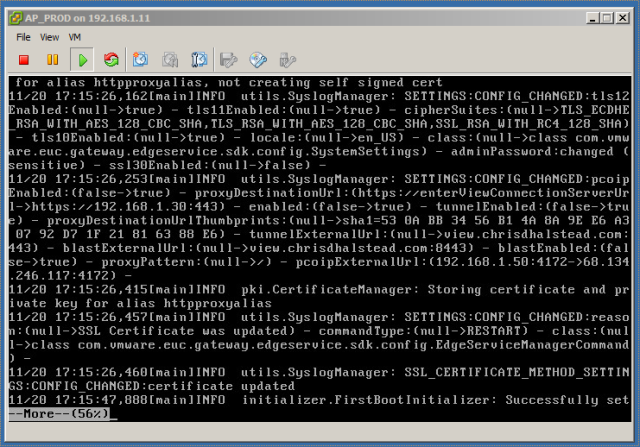
Once you have all of the required information set, you will see a dialog which shows the progress of the deployment process of the appliance.  The data that is shown is the direct output from the OVFTool.

Screen Shot 2015-11-20 at 12.10.57 PM

You can also monitor the deployment process from Virtual Center:

Screen Shot 2015-11-20 at 12.11.05 PM

Verifying Deployment

Once the appliance is deployed, open the console and log in as:

username: root
password: (root password you specified during deployment)

Screen Shot 2015-11-20 at 12.17.51 PM

We are going to review the logs to see where our settings are being applied to the access point appliance.

NOTE: This same process is used for troubleshooting.  If you notice the appliance is not responding and is CPU pegged, it is likely that an invalid parameter was passed in.  This process will allow you to troubleshoot those issues as well.

Type the following to open the API log:

more /opt/vmware/gateway/logs/admin.log

Screen Shot 2015-11-20 at 12.23.45 PM

Testing Deployment

The first thing I test is to connect directly to the internal IP address of the Access Point appliance and make sure that it presents the appropriate View Connection server.  This is a good way to test basic functionality of the Access Gateway without involving firewalls, etc.

Screen Shot 2015-11-20 at 12.25.52 PM.png

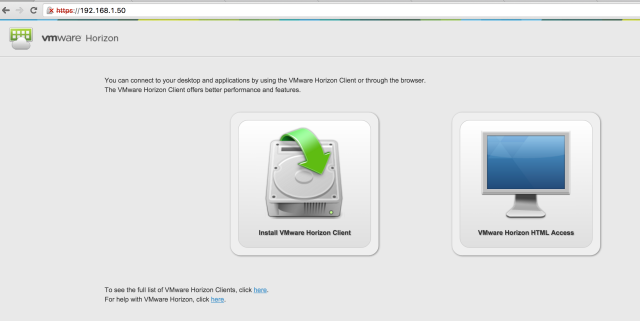
Internal Access Test

The final test is to connect to the external Access Point URL and verify that you are able to connect via all protocols configured (PCOIP, Blast).

This is also where you test that the certificate import was successful by verifying the appliance is using the certificate you set at deployment:

Screen Shot 2015-11-20 at 12.28.28 PM

External Access Test

Screen Shot 2015-11-20 at 12.29.21 PM.png

Verify Certificates

Screen Shot 2015-11-20 at 12.34.11 PM

External Access Test

Congratulations!  You have deployed the VMware Access Point Appliance!

You can download the application below to test in your environment.

Troubleshooting

The most common error is going to be a variant of the following:

Locator does not refer to an object: vi://chris%40halstead.net@192.168.1.12:443/Home Datacenter/host/192.168.1.11

This error means that some part of the OVF Tool locator string is not right. The OVF Tool is case sensitive when it comes to the locators.   Check the following for typos or case sensitivity:

  • Virtual Center
  • ESX host
  • Data Center
  • Cluster
  • Folder

Also, make sure you are not missing the Cluster name if you are using a cluster in your environment.

Download the Application

This is a 1.x version of the application and I haven’t been able to test all scenarios.  I would appreciate if others can test in their environments and provide issues, feedback and suggestions to me.   Thanks!

Changelog:

  • 1.0.0.1
    • Added check for short string such as * in Thumbprint
  • 1.0.0.2
    • Added ability to input a vCenter cluster name during deployment
  • 1.0.0.3
    • Fixed issue with Chrome adding a Unicode character (<u+200E>) at beginning of Thumbprint when pasted in which would hang appliance at startup.
    • Fixed issue when not deploying all View options where those options were still set with invalid values and appliance would hang at startup.

Download VMware Access Point Deployment Utility 1.0.0.3

NO TECHNICAL SUPPORT IS PROVIDED FOR THIS PRODUCT.

Posted in Access Point, Horizon View Utilities | 15 Comments

VMware App Volumes Self Service Utility

VMware App Volumes Self Service Utility

Last week we VMware held it’s Tech Summit for the SE and PSO organizations.   As part of the event there was a Hackathon held where employees could develop a “hack” for existing VMware technologies.   I participated and decided to develop a Self Service for App Volumes.   This application won second place in the Hackathon, and with 17 pretty amazing teams participating, I was very excited and decided to share the application.

App Volumes is great and has a lot of flexibility, but it is primarily a “push” technology.   You assign AppStacks to a user, group, ou or computer.  This is somewhat static and when a user wants a new application they have to put a request in so an App Volumes admin who can then go into the App Volume manager and assign the AppStack.

With this utility, the process is “pull” where the user can see available AppStacks, select and attach them on demand.   AppStacks are filtered automatically, and the user only sees those AppStacks which apply to the Operating System and Architecture they are running.   The AppStacks are attached as Machine Assignments and are immediately available.

The user can also remove AppStacks on demand and any current or pending Assignments are visible through an Advanced View.   There are also switches that can be used with a solution such as VMware UEM.   The user can also right-click an AppStack to see what applications are installed in the AppStack prior to attaching it.

How It Works

The application is written in VB.NET 2013.  When first launching the application, if no SQL connection has been established it will prompt the user to enter the address and name of the App Volumes database.   The application runs under the security context of the user launching the application, so that user must have at least read access to the database.

When the user clicks the “Refresh AppStacks” button, the application connects to the App Volumes database and filters AppStacks by OS and Architecture and provides the user a list.   It also queries the database for an assignments for the current user or computer and will display those along with any currently attached AppStacks.

When a user selects one or more AppStacks to attach, the application first checks to see if there are any user assigned AppStacks attached.  In AppVolumes, you cannot have both user assigned and computer assigned stacks attached at the same time.

This application will automatically remap any user assigned AppStacks as computer assigned so additional AppStacks can be attached to the current system.   It will even remap a writable volumes if one exists.   It attaches and detaches AppStacks using the svservice.exe file which is installed in every AppVolumes agent installation.  The database is accessed read-only and any attach and detach actions are handled locally.

Pre-requisites

  • App Volumes Agent installed  and registered on the client
  • .NET Framework 4.0
  • Users must have read-only access to the App Volumes SQL Database

Usage

  1. Download Manage_AppStacks.exe from the link below and place on a system running an App Volumes Agent.   If you try to run this application on a system without an App Volumes agent, you will get the message below and the app will exit.

    Screen Shot 2015-10-09 at 12.54.45 PM

  2. Make sure the user that will use this application have at least read-only access to the SQL database for App Volumes.   You can accomplish this by creating a SQL login for an AD group, and granting that login access to the App Volumes SQL database.   I would recommend only adding that login to the db_datareader role.   This will only grant that login read-only access to the AppVolumes SQL database.

    Screen Shot 2015-10-09 at 12.57.59 PM

    Also, make sure the SQL Server Browser Service is running on the SQL Server.

  3. Start the application by opening “Manage_AppStacks.exe”
    Note – If running on a system with UAC, you may have to set this .exe to run as administrator.  

    Screen Shot 2015-10-09 at 1.04.11 PM

    Screen Shot 2015-10-09 at 2.22.25 PM

  4. The first time you launch the application you will get a message that no SQL Server is configured and you will be prompted for the SQL server name and Database name.  Enter the name and any instances (ex: servername\instancename).   If you need to specify a custom port for SQL, you can do that by adding a comma and port after the server name (ex.  servername,port).  These settings are stored in the registry under HKCU so once you put in a setting it will persist for that user.  Settings can also be pre-populated with a solution such as VMware UEM.

    Screen Shot 2015-10-09 at 11.47.21 AM
    Screen Shot 2015-10-09 at 11.47.40 AM
    Screen Shot 2015-10-09 at 1.08.40 PM|

  5. Once SQL has been configured, you can populate AppStacks.  Click the “Refresh AppStacks” button.   This will connect to the SQL database, and provide a list back of the AppStacks which can be attached to the system you are running on.   You will also see any current attached AppStacks.

    Screen Shot 2015-10-09 at 1.14.39 PM

  6. You can also browse each AppStack to see what applications are installed inside of it, but right-clicking the AppStack and selecting “Show Installed Applications”.

    Screen Shot 2015-10-09 at 1.20.02 PM
    Screen Shot 2015-10-09 at 1.22.46 PM

  7. If you want to attach one or more AppStacks, simply select the AppStacks and choose Attach Selected AppStacks.  You will receive a confirmation message showing the AppStacks you have selected.   If there are no user assigned AppStacks currently attached to the system, the AppStacks will immediately attach and the applications will be available immediately.

    Screen Shot 2015-10-09 at 1.28.17 PM

    If there are user attached AppStacks you will see the message below with an additional confirmation message:

    Screen Shot 2015-10-09 at 11.36.35 AM

    If you click yes any user assigned AppStacks will be re-attached as machine attached AppStacks.   This allows the user to add additional AppStacks to the machine since both user and machine attached AppStacks cannot be mapped at the same time.

    Note: Unless removed, there could be two assignments for an AppStack that is maped this way (Machine and User).  In the Advanced section of this article I will discuss a /logoff switch that can be called through logoff script or UEM to automatically un-map any machine based assignments at logoff.

  8. AppStacks that are attached through the program can be dynamically removed by selecting any attached AppStacks and selecting “Detach Selected AppStacks”.   The selected AppStacks will be immediately detached and unassigned.

    Screen Shot 2015-10-09 at 2.01.42 PM

  9. To exit the application, you need to select File | Exit  or choose Exit from the system tray context menu.

    Screen Shot 2015-10-09 at 2.25.04 PM

Advanced Features:

  • Minimize to System Tray – The either minimized or the “X” close button is clicked from the application, it will be minimized to the system tray.   There is a right-click context menu available from the tray icon that can be used to maximize the application or exit.
    Screen Shot 2015-10-09 at 2.10.46 PM
  • Show Advanced Features –

    Screen Shot 2015-10-09 at 2.18.13 PM

    Screen Shot 2015-10-09 at 2.18.22 PM

  • /logon Switch –  This switch can be called from a logon script or UEM to automatically remap any user attached stacks as machine attached.

    Screen Shot 2015-10-09 at 2.27.41 PM

  • /logoff Switch – This switch can be called from a logoff script or UEM to automatically un map any machine attached stacks attached during the user session.

    Screen Shot 2015-10-09 at 2.27.32 PM

  • RDSH –  This utility can also be used with RDSH servers (VMware or Citrix) that have the App Volumes agent installed.   The utility will only show those AppStacks that apply to the RDSH host.   AppStacks can be browsed by right-clicking to see what they contain.   I publish this utility as a hosted application and manage the delivery of AppStacks to my RDSH hosts that way.

    Screen Shot 2015-10-09 at 2.48.24 PM

Conclusion

Hopefully this utility will be helpful.  I will continue to update it – so keep checking this blog for updates.   I will be rewriting this utility to use the App Volumes API, but since there is no RBAC for App Volumes yet, anyone who was going to use the application would need to be an App Volumes administrator.   The first release with the API will allow the user to select if they want to use SQL or the API to read data.

Please let me know your feedback either as comments on this article, or be reaching out to me on twitter at @chrisdhalstead .   A demo of the utility and the download are located below.  Enjoy!

Demo of the App Volumes Self Service Utility

Check out the following video to see a demo of the Self Service Utility:

Download the App Volumes Self Service Utility

Click the below link to download and test this utility.   I appreciate feedback and suggestions!

Download App Volumes Self Service Utility

USE AT YOUR OWN RISK. NO TECHNICAL SUPPORT IS PROVIDED FOR THIS PRODUCT.

Posted in App Volumes | Tagged | Leave a comment

Add Restriction Tags to VMware Horizon 6 Hosted Applications

Background

I have had several customers ask if it is possible to add restriction tags to Hosted Application pools in the same way they can be applied to desktop pools.    Restriction tags allow you to choose which connection server brokers a desktop (or application) is available from.   This can be used to restrict certain pools from being available only internally or only externally when paired with a security server.   This functionality has existed for a long time for Desktop pools, and there is no current way in the GUI to set this for Application Pools.

One of my colleagues was asking about this again last week, so I decided to dig into the View ADAM (Active Directory Application Mode) LDAP store and see if it was possible to manually add a tag to an application pool.   Tags are stored in an attribute called “pae-EntitlementsTagString” for both connection servers, and pools.

Before we get into the process, please note:

ADDING TAGS TO HOSTED APPLICATIONS IS NOT CURRENTLY SUPPORTED!
This post and application are just showing what is possible – use at your own risk!

Setting Tags on a Connection Server

Browse to a connection server in the View Administrator

  • Choose Edit
  • On the general tab to you will see a Tags section – add one or more tags separated by either semi-color or comma.

Any pools set with this tag can only be accessed from a connection server with the corresponding tag applied.

Screen Shot 2015-09-14 at 9.20.10 AM

Once you add the tags they are written into the “pae-EntitlementsTagString” attribute in the ADAM store.

Screen Shot 2015-09-14 at 9.47.48 AM

Setting a Tag on a Published Application

Once you have one or more tags added to one or more connection servers, you can apply the tag to a Desktop pool, or in this case an Application pool.   Each Application pool has the same “pae-EntitlementsTagString”.  

Screen Shot 2015-09-11 at 2.55.48 PM

If i manually add the “EXTERNAL” tag to the pool and then log into a connection server via either the Horizon Client or the HTML access portal I will see that the Calculator application as well as a Windows 7 pool which are both tagged “EXTERNAL” are only visible and available on the connection server which is tagged with “EXTERNAL”.  Ok, it works perfectly.   How to set this value easier and also provide a list of all connection server tags which are available?  That why I wrote the application.

Screen Shot 2015-09-11 at 6.31.12 PM

VMware Horizon Tag Published Apps Utility

To the the process of adding tags to published applications easier I wrote a small .NET application.  You specify the address of a valid connection server and it binds to the ADAM LDAP store and reads and write the appropriate data.

One you successfully connect it first provides a list of all published applications into a dropdown box.

NOTE: You must execute this application under the context of a View Administrator that has proper access to view and edit the ADAM store.  

Screen Shot 2015-09-14 at 10.17.55 AM

Then select one of the published applications or click the “Refresh Tags” button.  This will populate the “Connection Server Tags” list with all available Tags and it will check any tags that are currently applied to that published application.

Screen Shot 2015-09-14 at 10.14.00 AM

You can now check or uncheck tags as desired and hit “Save Settings”.   This will write the changes into the ADAM LDAP store and the changes are made dynamically.  Hit “Refresh Tags” to verify the changes.

Screen Shot 2015-09-14 at 10.25.09 AM

That’s it!  Pretty simple application that allows you to add tags to published applications in VMware Horizon 6.   But remember, this is not currently supported!  

The application is available from the link below – please test it out and let me know your feedback and suggestions!

Download the VMware Horizon Tag Apps Utility Here!

Posted in Horizon View Utilities | Leave a comment

VMware User Environment Manager (UEM) – Part 1 – Overview / Installation

VMware recently announced the release of the User Environment Manager (UEM) product.   This is the former Flex+ product from the acquisition of Immidio.   I have had the opportunity to test the solution over the past several weeks.   I really like the solution and the granularity of application and environment settings that can be managed.   I will be releasing several blog articles going over how to use different features within VMware UEM.    In this initial article in the VMware UEM blog series I will go through the process of installing and doing initial configuration of the UEM solution.

Overview:

VMware User Environment Manager (UEM) can be used to manage Windows and application settings across hardware types and operating systems.   Instead of managing user settings within the monolithic Windows profile, settings are managed individually with .xml files and registry keys.   This allows application settings to dynamically roam between physical systems, virtual desktops and RSDH published applications.   The solution can also be used on physical systems.   This means a user can make an application change on a Windows XP physical desktop, open the same application through RDSH on 2012 server and the settings from XP will persist.    This is possible because UEM doesn’t rely on the Windows profile to store and retrieve data.   Solutions that rely on the Windows profile cannot easily migrate between older and newer Windows operating systems as there are V1 and V2 profiles.   XP and Server 2003 use V1 and Windows 7 and 2008 Server and later use V2.  VMware UEM has no issue roaming settings between these operating systems.

What I really like about VMware UEM is that there is no infrastructure required.  It utilizes what the customers already have in place today.   It simply requires two file shares (configuration data and user data) and Microsoft Group Policy in order to setup the solution.   UEM uses Group Policy to execute the process of copying user application settings to the Windows system on logon, and to the file share on logout.   There is a management condole which points to the configuration file share and provides an easy to use GUI for modification of settings.

One feature I really like and think will be extremely valuable to customers is DirectFlex profiles.  When using a DirectFlex profile, instead of injecting the application setting when the user logs in, UEM will copy the settings when the user launches the application.    We can also trigger custom actions when the application launches.   Think about how many applications require custom mapped drives or printers.  Typically, we would map those drives or printers when the user logs into the setting with a logon script.   With DirectFlex profiles we can map the drives or printers only when the user launches the application that needs them and remove them when they exit out the application.  Very cool!

That’s it!  No database, no dedicated server.  Let’t go through the process of initial configuration of VMware UEM now.

Installation:

UEM File Shares

When installing VMware UEM, the file shares should be created first.    There are two files shares required, a share for configuration data and one for user data.

UEM Configuration Share –  This share contains all of the configuration data for UEM.  Administrators will need to be able to read and write to this share and users will need to be able to read from it.   The share can be any standard CIFS share.   DFS namespaces are supported as well for use across a WAN.     The space required on this share is very low  – 1GB of space is typically sufficient.

Setting up the share:

Example Name: \\server\UEMConfiguration

Share Permissions:  UEM Administrators – Change
UEM Users – Read

NTFS Permissions:  UEM Administrators – Full Control
UEM Users – Read / Execute

Screen Shot 2015-04-19 at 10.14.08 AM

UEM Profile Archive Share – This share is used to store the personal settings for each user. A folder is created for each user under this share.   Settings are read from this share and applied at logon or application launch (DirectFlex) and saved on logoff or application exit. Just like the configuration share, this is just a standard CIFS share and DFS namespaces are supported.   The space required will depend on what type of data is being captured by UEM, but 100mb per user is a good number for planning purposes.

Setting up the share:

Example Name: \\server\UEMProfileData

Share Permissions:  UEM Administrators – Change
UEM Users – Change

NTFS Permissions:  UEM Administrators – Full Control
apply to: “This Folder, Subfolder and Files”

UEM Users – Read / Execute, Create Folders / Append Data
apply to: “This Folder Only”

Creator Owner – Full Control
apply to: “Subfolders and Files Only”

Screen Shot 2015-04-19 at 11.30.44 AM

Import Group Policy ADMX Templates

Now that we have our UEM file shares created we can import the ADMX files required for UEM.  As I mentioned earlier, UEM relies on Microsoft Group Policy to apply and save settings.   The templates are provided as ADMX files which must be installed into the central Active Directory policy store.   There are six .admx and corresponding .adml files located in the installation files “Administrative Templates (ADMX)” folder.

Screen Shot 2015-04-19 at 9.33.42 AM

Installing UEM ADMX Templates  – Browse to the following path in your domain:

\\yourdomain.net\SYSVOL\yourdomain.net\Policies\PolicyDefinitions

Copy the six VMware UEM .admx files provided into this location

**NOTE – if UAC is turned on, you may note be able to write into this folder even if you have permissions**

Screen Shot 2015-04-19 at 10.49.39 AM

Copy the six VMware UEM language resource files into the en-US folder located at:

\\yourdomain.net\SYSVOL\yourdomain.net\Policies\PolicyDefinitions\en-US

Screen Shot 2015-04-19 at 11.06.04 AM

POC Settings for ADMX Files

For a Proof of Concept installation, the ADMX and ADML files can be installed locally to %windir%\PolicyDefinitions and %windir%\PolicyDefinitions\en-us respectively.  **NOTE – This is NOT supported for production environments.**

Screen Shot 2015-04-21 at 10.39.30 PM
Screen Shot 2015-04-21 at 10.41.50 PM

When using this POC method, all of the UEM GPO settings detailed in the next section will be managed via the Local Computer Policy MMC snap-in.

Screen Shot 2015-04-21 at 10.44.29 PM

Configuration of UEM Group Policy Settings

Now that we have created the file shares and imported the ADMX files we can configure the Group Policy settings for UEM.   VMware UEM only supports User settings in group policy.  The GPO settings should be applied at an OU where the users who will be using UEM are located.  If this is not possible, the computers the users will log into can be in the OU where the UEM GPO settings are applied, but Loopback Processing must be enabled.

Open the Microsoft Group Policy Management Console and browse to the OU you want to apply the VMware UEM settings to.  Right-Click the OU and select “Create a GPO in this domain, and Link it here”.   Name the GPO and then right-click the policy and choose edit to modify it.

Screen Shot 2015-04-19 at 11.10.04 AM

Browse to:  User Configuration | Policies | Administrative Templates | VMware UEM | FlexEngine

Screen Shot 2015-04-19 at 11.17.37 AM

We will just configure enough to get UEM working for user settings.  There are many other settings and features, but I will cover those in future articles.

Let’s configure the minimal settings required at this time.

Flex Config Files:  Double-Click the Flex Config Files setting to modify it.   Select “Enabled” then specify the path to the configuration share you created earlier.  Add a “General” Folder at the end of your file share path.   This is where UEM will create the configuration files.   Check the “Process folder recursively” box.   This allows UEM to read all of the sub-folders in the configuration share.   If you wanted certain users to only see specific settings you could restrict them to a single folder by leaving this box unchecked.

Screen Shot 2015-04-19 at 11.25.09 AM

example:example:\\home-dc\uemconfiguration\general

Run FlexEngine as a Group Policy Extension:  Edit this setting and choose “Enabled”.   This is essentially the on/off switch for applying settings with VMware UEM.  If this setting is not enabled so settings will be applied on logon.

Screen Shot 2015-04-19 at 11.27.27 AM

FlexEngine Logging: This settings allows VMware UEM to write log files into the user profile archive share.   This is not required, but highly recommended to make sure you can properly troubleshoot and monitor the environment.  Select “Enabled” and then type the path to the user profile archive share created earlier.   Append %username%\logs\flexengine.log at the end of the share path and click ok.

example:\\home-dc\uemprofiledata\%username%\logs\flexexgine.log

Screen Shot 2015-04-19 at 11.32.34 AM

Profile Archive Backups:  This settings is used to maintain backup copies of the user settings which can be restored via self-service or via the help desk.  Select “Enabled” and then type the path to the user profile archive share appended with \%username%\backups.  Change the “Number of Backups per profile archive” to “5” and check the “Create single backup per day box.  Click OK.

example:\\home-dc\uemprofiledata\%username%\backups

Screen Shot 2015-04-19 at 11.39.24 AM

Profile Archives:  This is the share you created earlier where the user settings will be stored.  A subfolder will be created for each user.   Select “Enabled” then enter the path to the user profile archive share appended with %username%\archives.  Check the “Compress profile archives” box.  This will .zip up the configuration data to save space.

example:\\home-dc\uemprofiledata\%username%\archives

Screen Shot 2015-04-19 at 5.33.35 PM

These are all the user configuration settings that a necessary for VMware UEM.  There are a couple of other general GPO settings that needs to be applied before we are done.

Set Logoff Script: We need to set a logoff script to ensure that all user settings are written out at logoff.   It is done through a logoff script as there is no way to process actions on a logoff in Group Policy currently.  This script will run the VMware UEM agent with a -s switch to save user settings on logoff.

Browse to “User Configuration | Polices | Windows Settings | Scripts (Logon/Logoff), and double-click the “Logoff” setting.

Screen Shot 2015-04-19 at 12.00.05 PM

Click “Add” and type in the following:

Script Name:  C:\Program Files\Immidio\Flex Profiles\FlexEngine.exe
Script Parameters:  -s

Screen Shot 2015-04-19 at 12.04.36 PM

Click OK to save.

General GPO Settings:  There are a couple of general GPO settings that control the application of the VMware UEM GPO settings.

Always wait for the network at computer startup and logon – This setting ensures that the VMware UEM GPO settings will apply when the user logs into the system.

Browse to: Computer Configuration | Administrative Templates | System | Logon

Screen Shot 2015-04-19 at 11.58.21 AM

Double-click “Always wait for the network at computer startup and logon”

Select “Enabled” and click OK

Screen Shot 2015-04-19 at 12.12.35 PM

User Group Policy loopback processing mode (OPTIONAL) – This setting only needs to be turned on if you want to apply VMware UEM settings to at OU containing computer objects.   If you are applying the policy to an OU with only user objects this policy setting is not required.   To enable this setting do the following:

Browse to: Computer Configuration | Administrative Templates | System | Group Policy

Double-Click “User Group Policy loopback processing mode”, select “Enabled” and change the mode drop-down to “Merge”.  Click OK to save the settings.

All of the back-end requirements for VMware UEM have been configured – we can proceed to installing the client and the management console.

Installing the VMware UEM client:

In order for VMware UEM to be able to manage settings on a system, the UEM FlexEngine must be installed.  The UEM FlexEngine installation is provided as an .msi file.   There is an .msi for both 32 and 64-bit systems.   Choose the proper installation file, taking the defaults.   You will need to specify the license file as part of the installation as well.

Screen Shot 2015-04-19 at 12.23.17 PM

Screen Shot 2015-04-19 at 12.27.38 PM

Screen Shot 2015-04-19 at 12.25.47 PM

You can verify the FlexEngine install process succeeded by looking for the VMware UEM Service.  For Virtual Desktops this can be installed within the Gold Image.

Screen Shot 2015-04-19 at 12.26.29 PM

At this point we need to install the UEM Management Console.

Installing the VMware UEM Management Console:

The UEM management console is really just a GUI front-end for the configuration share data.   The configuration files can be modified inside or outside of the Management console.  The same installation file that was used for the FlexEngine is used to install the Management console.   Choose the proper installation file for the processor architecture you are going to run the console on and execute the install process.

Screen Shot 2015-04-19 at 12.23.17 PM

Select the “Custom” setup type and right-click “VMware UEM FlexEngine” and choose to NOT install on this computer.   Right-Click VMware UEM Management Console and choose to install on this computer.

Screen Shot 2015-04-19 at 4.01.13 PM
Screen Shot 2015-04-19 at 4.01.35 PM

Now that the management console is installed we can connect to the configuration share and test the VMware UEM solution.

Initial configuration of Management Console

When you launch the VMware UEM Management Console the first time, it will prompt for a location of the UEM Configuration Share.   This is the share we setup earlier – specify the share name and click OK

example: \\home-dc\UEMConfiguration

Screen Shot 2015-04-19 at 4.20.38 PM

Take the defaults and click OK at the settings page.

Screen Shot 2015-04-19 at 4.26.12 PM

We will now enable “Easy Start” to pre-populate UEM with many popular Windows and Application settings.  This is a great way to start and learn the product.

Screen Shot 2015-04-19 at 4.26.22 PM

Select any versions of Office you would like to manage with UEM and click OK.

Screen Shot 2015-04-19 at 4.26.36 PM

At this point we have done an initial configuration of UEM – we can verify that the settings have been copied to the configuration share by navigating to it and verifying it matches the settings in the Management Console GUI.

Screen Shot 2015-04-19 at 4.26.52 PM

Screen Shot 2015-04-19 at 4.47.55 PM

The next step is to test the UEM solution, review logs and start configuring Application, Windows and User Environment settings.  These steps are covered in Part 2 of this blog series.

Posted in VMware UEM | Tagged , | 10 Comments

VMware Horizon View Events Database Export Utilty

Update 4/29/15 

This utility is now available for download as a VMware Fling!

https://labs.vmware.com/flings/horizon-view-events-database-export-utility

Update 2/9/15 – Version 1.5 available for download.

New Features:

  • Added pool filtering
  • Added Client IP address output (from BROKER_USERLOGGEDIN event type)
  • Additional fixes, debugging and error trapping

Download and try it out today!  As always, please reach out to me with issues and suggestions.

Also check out a great article on this utility from my friend and EUC Rockstar Stephane Asselin:   http://myeuc.net/2015/01/29/the-big-easy-button/


Background:

The VMware View Events Database is used to record all events that happen in a View environment.   There is a ton of great information in the database, but it can be difficult to extract.   I wrote the View Event Notifier  last year which provides for real-time alerting, but it doesn’t allow for a lot of filtering.  I wrote this utility to allow administrators to easily apply very detailed filtering to the data and export it to .csv.  You can filter on time range,  event severity, event source, session type (Application or Desktop), Usernames and Event Types.   The application allows for extremely granular export of data.   The exported columns can also be customized and the application will export data from both the live and the historical tables in the View Events Database.

Prerequisites:

  • Single application .exe that only requires the Microsoft .NET 3.5 Framework
  • At least DB Reader access to the View Events DB via SQL or Windows authentication

Usage:

When you open the application the first time you will need to establish a connection to an existing View Events DB.  You can choose to authenticate via SQL or Windows authentication, depending on what your SQL server is currently configured for.  This connection data is stored in the registry under HKCU\Software dynamically as you type in the settings.   The password if using SQL Authentication is encrypted in the registry.

SQL Auth Type:  Choose Windows or SQL.  Windows will pass through the credentials of the currently logged in user.

DB Server:  The address to the SQL server along with the instance name if required.  server\instance

Database:  The name of the View Events Database

Username:  The SQL username with at least read access to the DB if using SQL Authentication.

Password:  The SQL password if using SQL Authentication.   The password is encrypted when stored.

Table Prefix:  View allows the use of a table prefix so you can monitor multiple view instances from the same database.   If table prefix is used, type it in.

Click “Test Connection”  – this will initiate a connection to the database and indicate success or any connection issues.  If any required data is missing you will be notified as to what information must be entered in order to connect to the SQL DB.

Screen Shot 2015-02-09 at 2.54.37 PM

Screen Shot 2015-02-09 at 3.15.50 PM

Screen Shot 2015-02-09 at 3.15.35 PM

When you are able to connect to the database successfully, click the “Connect to DBServer” button at the bottom of the form.  You are now connected to the View Events DB.  The button will indicate connection state.  You can click the button again to disconnect from the DB server.

Screen Shot 2015-01-26 at 10.47.48 AM

Filtering Data:

As mentioned earlier the application allows for many layers of filtering of the View Event data before export.

General Filtering

The general filtering tab allows for high-level filters to be set that will apply to the data as it is queried and exported.

Query Historical Data:  By checking the “Query Historical Data” checkbox, the application will use the historical tables in the View Events DB to query older data.

Time Range:  The time range will automatically be populated with the time of the first and last event in the View Events DB.  You can click the date/time picker to choose a specific start and end date range to query.

Screen Shot 2015-01-26 at 10.42.59 AM

Query on Severity:  The “Audit Fail”, “Warning”, “Informational” and “Error” checkboxes control what severity of events you want to query and export.  They are all selected by default.

Screen Shot 2015-01-26 at 10.42.39 AM

Query on Module: The “Broker”, “Admin”, “Agent” and “Vlsi” checkboxes allow you to determine what modules you want events to be exported for.

  • Broker –  All brokering activity
  • Admin –  Administrative actions, typically through the GUI
  • Agent –  View Agent events
  • Vlsi – VMOMI Leveraged Server Infrastructure – These are API related calls.

Screen Shot 2015-01-26 at 10.42.46 AM

Session Type:  You can query if you want to return only desktop or application session types.  NOTE:  This entry is only populated for specific events, so use sparingly to avoid limiting search results too much.

User Filtering:

By default the application will return data for all usernames when running a query.  The user filtering tab allows you to filter the results returned on specific usernames.  The usernames are populated dynamically out of the Events Database, so there is no need to type them in.

To filter on usernames do the following:

  • Click the “Refresh Users” button to populate the list of usernames.
  • Select the users you want to filter on and click the down arrow to add to the “Users to Export Data For” list box.
  • You can de-select a user by selecting it in the “Users to Export Data For” listbox and clicking the Up Arrow.
  • If you want to reset the filter to all users, click the “Return Data for All Users” checkbox.
  • NOTE: If you choose to filter on usernames, the application will automatically filter the items in the “Event Filtering” and “Pool Filtering” tabs based on records for those specific users.  That way you will see the only records that actually apply to those users.

Screen Shot 2015-02-09 at 3.06.08 PM

Pool Filtering:

The application allow filtering of specific desktop pools,  you can select as many pools as you want to return.   If you filter on any users, you will only see the pools that apply to those specific users.

  • Select the pool names you want to query on and click the Down Arrow to add to the “Pools to Export Data For” listbox.
  • Selected Pools can be removed by selecting them in the “Pools to Export Data For” listbox and clicking the Up Arrow.

Screen Shot 2015-02-09 at 3.39.22 PM

Event Filtering:

The application allow filtering of specific event types, you can select as many event types as you want to return.   These events are also filtered by selecting the “Module” checkboxes on the “General Settings” tab as shown above (Broker, Agent, Admin, Vlsi).  In addition, if you filter on any users, you will only see the event types that apply to those specific users.

  • Select the event types you want to query on and click the Down Arrow to add to the “Events to Export Data For” listbox.
  • Notice in the screenshot below how events are filtered based on selected users and the label indicates this filtering.
  • Selected Event Types can be removed by selecting them in the “Events to Export Data For” listbox and clicking the Up Arrow.

All Event Types:
Screen Shot 2015-02-09 at 3.21.29 PM

Event Types Filtered by Users:
Screen Shot 2015-02-09 at 3.06.24 PM

Exporting Data:

At this point, you are ready to export data based on the filters you selected.  Click on the “Export Data” tab.

Columns to Export
You can choose which columns to export into the .CSV file.   Simply check or uncheck the column name to add or remove it from the output.  NOTE:  certain columns are specific to user events (Pool Name, Username, Session Type and Desktop Name), and the Server Name column is only available when no users are selected.  Client IP Address is only available when the BROKER_USERLOGGEDIN event type is selected or All Events are returned.
Screen Shot 2015-02-09 at 3.48.21 PM

Select File to Export Data Into

At this point you will select a .csv file to export the data into.  You need to use the built-in file save dialog to select the file.   Click the Screen Shot 2015-01-26 at 11.13.18 AM button to open the file save dialog.   The application will provide a default name – you can chance the name as required.   Click the “Save” button when you are satisfied with the file name and location.

Screen Shot 2015-01-26 at 11.18.41 AM

Show SQL Command:  This is an optional item that will show you the parameterized SQL command to be executed.

Screen Shot 2015-01-26 at 11.25.10 AM

Click the Screen Shot 2015-01-26 at 11.22.11 AMbutton when ready to export the data.

The query will now export and you will see a progress bar and the “Export Status list box will populate with the data as it is written to the .csv file.

When complete, you will receive a message box indicating the path to the file and how many records were exported.

Screen Shot 2015-02-09 at 3.51.26 PM

A button below the “Export Status” listbox will also appear which will allow you to open the export file automatically with the application associated with the .csv extention (typically excel).

Screen Shot 2015-01-26 at 11.29.55 AM

Screen Shot 2015-02-09 at 3.05.34 PM

At this point the data has been exported and you can review as needed and run as many more exports as needed.

I hope this utility will be helpful for organizations running VMware View.  Please let me know of any issues, questions or suggestion at chrisdhalstead@gmail.com or on Twitter at @chrisdhalstead.

You can download the application here:

https://labs.vmware.com/flings/horizon-view-events-database-export-utility

Posted in Reporting | Tagged | 11 Comments

SyncFiles Utility

I actually wrote this utility a few months ago, but it was very useful for the customer I developed it for so I wanted to share it.   This utility was developed because a customer of mine was looking at going to VDI, but they application they used wrote configuration data into locations outside of the user profile which would be replicated with a tool like VMware Persona Management.   It can be used to sync files both on logon and logoff.  It also logs all activity for troubleshooting.   This utility can be very useful anytime files not located in the user profile need to be synced or even if only specific files in user profile need to be synced.  It will work with any VDI or Published Application solution.

Overview:

The application was developed in .NET 2013 and is a very simple console application.   The configuration for the utility is within the .NET configuration XML file.  Both the .exe and the config file need to be kept together and can be called from any logon script to run when the user logs into the VDI or Published App session.

Prerequisites:

  1. Create a shared CIFS folder where the synced data will be stored on logoff and then pulled from on logon.  Make sure the user has permission to create folders and files in this directory.  The application will create a folder based on the username of the user executing the utility.
    Screen Shot 2015-01-06 at 9.35.33 AM
  2. Create a shared CIFS folder (can be the same one you created earlier), for the log files to be placed if you choose to enable logging.  Same as before, the user executing the sync needs to be able to write into this directory to be able to create the log file and update it.
    Screen Shot 2015-01-06 at 9.49.25 AM
  3. The application requires the Microsoft .NET framework 3.0 be present on the systems where it will run.

Configuration:

All configuration is done within the XML configuration file “SyncFiles.exe.config” This file can be modified in any standard text editor, including notepad.

  1. Configure location to sync files to and from.   This should be a standard CIFS file share.  Enter the share UNC in the “Sharepath” configuration section inside the value key.

    share

  2. Configure files to sync.   Many files can be configured for sync, the file paths need to be separated by a pipe “|”.  The full path to the local file that needs to be synced should be specified in the configuration file.
    files
  3. Configure log file path.   Enter the path to the CIFS file share you created earlier where the logon and logoff logging will be captured.  Note:  This is dependent on the EnableLogging value being set to True.  If you don’t want to enable logging you can skip configuring this value.
    loglocation
  4. Configure Logging.  If set to True, logging events will be captured for Logon and Logoff events.  The log file is stored in the following format Username_action. Example:  Chris_Logoff.txt
    logging
    logfile
  5. Set direction of file copy.   This utility can be used for both logon and logoff events.  On a logon event, the specified files will be copied from the network share location to the local computer.  On a logoff event, the specified files will be copied from the local computer to the network share.

    To configure for a Logon set the IsLogon value to True:
    Logon

    To configure for a Logoff set the IsLogon value to False:
    Logoff

  6. Set ForceCopy value.   If set to true the utility will always overwrite the files on either a logon on logoff event.  If set to False the utility will examine file timestamps to overwrite only newer files.

ForceCopy

Using the Utility:

Once you have the utility configured you can execute the file by running SyncFiles.exe to test the results.  You need to keep the SyncFiles.exe and the SyncFiles.exe.config file in the same directory.  You can call the utility using an existing logon script or you can set the file directly as a logon script as shown below.

GPO

The files will be copied to the designated user folder with the full file path in the file name on the network share as shown below:

Screen Shot 2015-01-06 at 11.12.42 AM

Please let me know of any suggestions, comments or issues.  I can be reached on Twitter at @chrisdhalstead

You can download the SyncFiles Utility Here:  http://goo.gl/Bxu5Nq

Posted in Horizon View Utilities | Tagged , | Leave a comment

VMware App Volumes Event Notifier – Updated

Updated 1/6/15:

Based on feedback I made the following updates to the App Volumes Event Notifier:

  • Added Windows Authentication as a option when connecting to the App Volumes SQLDB
    • When adding or updating a DB you select either “Windows Authentication” or “SQL Authentication” for the connection.
    • Please use domain\username syntax for Windows Authentication connections

Screen Shot 2015-01-06 at 2.39.50 PM

  • Added a check to see if an instance of the application is already running.

Screen Shot 2015-01-06 at 3.10.54 PM

The updated version of the application can be downloaded here: http://goo.gl/bGIMsi

Keep the ideas and suggestions coming.   Thanks!


I have been running App Volumes for several weeks now in my home lab and working through a lot of Customer Demos where I am building up and tearing down my App Volumes environment very quickly.   I had some times where volumes didn’t mount properly and I had to keep going back to the System Messages section of the App Volumes web interface.

Screen Shot 2014-12-23 at 10.30.53 AM

To help with getting more real-time alerting on App Volumes system messages I wrote the App Volumes Event Notifier which is very similar to the Horizon View Event Notifier Fling I wrote (https://labs.vmware.com/flings/horizon-view-event-notifier).

This version is a Beta and doesn’t have many features yet.   I will add filtering and ability to send messages in batch in a upcoming release.  I wanted to get it out there so others can use and test.

Prerequisites:

  • System running .NET 3.5
  • SQL account with access to App Volumes DB

 Setup:

  • Place App_Volumes_Event_Notifier.exe and the associated XML configuration file in the same directory.
  • Launch the .exe and navigate to settings

Database Settings

  • Click “Add DB Server”
    • Enter a Friendly Name – in Name
    • Enter the SQL server and instance in DB Server (ex:  server\instance)
  • Enter the DB name in the database field.  NOTE: The default DB name for App Volumes is svmanager_production
    • Enter the SQL username and PW with access to the App Volumes DB
    • Click Save Changes – you can also test connection to the DB at this time.
    • You can add additional App Volumes DBs to monitor at this time by following the same process

Screen Shot 2014-12-23 at 10.04.06 AM

Events Settings:

  • There aren’t event types in App Volumes so you don’t need to set anything here
  • You can set how many minutes to query in the system messages table
  • Click Save Changes

SMTP Settings:

  • Enter SMTP server address
  • Enter port if not 25
  • Enter who to have alerts sent from
  • Enter list of users who will receive the alerts (comma separated)
  • You can send a test message
  • Select if you would like alerts sent via email or not
  • Click Save Changes

Running the Application:

  • Click “Start” then select the “App Volumes Events” tab to see any current events.
  • Click the X at the top right of the form to minimize to the system tray
  • The App Volumes Notifier Icon Looks like this:  Screen Shot 2014-12-23 at 12.16.03 PM
  • The tray icon can be right-clicked or double-clicked to bring the form back up

Stopping and Exiting the Application:

  • Click “Stop” to stop processing Events
  • Select File | Exit to close the application completely.

Screen Shot 2014-12-23 at 12.10.16 PM

Screen Shot 2014-12-23 at 10.05.06 AM

Screen Shot 2014-12-23 at 10.05.18 AM

The application can be downloaded here:  http://goo.gl/bGIMsi

This is a very basic version, and I would appreciate feedback on issues or suggestions.   You can send them to me via email:  chrisdhalstead@gmail.com or on Twitter: @chrisdhalstead

Thanks!

Posted in App Volumes | 3 Comments

Install / Configure VMware Horizon FLEX

In this article I will walk through the process of installing and configuring VMware Horizon FLEX.   Horizon FLEX provides policy-based management of encrypted, containerized Virtual Machines which run on a Type 2 Hypervisor such as VMware Player Pro or VMware Fusion Pro.   The primary use cases of Horizon FLEX are the disconnected road-warrior, contractors and BYO users.   It allows corporate customers to provide encrypted, managed corporate desktops to whatever desktop the end-user has and to set expiration or lock out the VM via Policy.  Mirage can be used to manage the FLEX machines for Disaster Recovery, software distribution, backup and patching.  This article will be modified as I learn more about the product and as the product is updated.

Installation:

Horizon FLEX is built on top of VMware Mirage 5.2, so the first step is to install Mirage 5.2.   We will first go through the process of doing a basic installation of Mirage.

I am creating this entire environment on two Virtual Machines running on top of VMware Fusion.  In order to get proper name resolution which is required for FLEX I am using a custom entry in the local hosts file on my mac.

Screen Shot 2014-12-22 at 5.36.37 PM

Certificates:

Certificates are critical to a FLEX installation and a CA issued or Third-Party certificate should be used.   The certificate chain (cert + CA cert) need to be installed and trusted on the client systems which are running Fusion or Player Pro as well.   This is only needed if you are using a certificate from a CA that is internal and not a generally trusted certificate like one from GoDaddy, Entrust, Etc.  

Request a certificate from a Microsoft CA

In this example I will be using a 2008R2 Domain Controller with the Active Directory Certificate Services role enabled in the Demo Domain.

Screen Shot 2014-12-22 at 5.25.56 PM

Create and use a Microsoft CA generated cert with FLEX

On the FLEX Server start the Certificates MMC snap-in and select “Local Computer”

  • Navigate to “Personal” | “Certificates”
  • Right-Click the Certificates folder and choose “Request new Certificate”
  • Select “Active Directory Enrollment Policy”
  • Choose “Web Server” – and Enter the Following at a minimum:
    • Common Name – FQDN of the Server
    • Alternative Name –
      • DNS – FQDN of the Server, IP Address if using local hosts file
      • IP Address
    • Private Key – Make the Private Key exportable

Screen Shot 2014-12-22 at 5.46.29 PM

Screen Shot 2014-12-22 at 5.48.59 PM

Screen Shot 2014-12-22 at 5.48.49 PM

  • Hit Enroll to generate the certificate.
  • Verify the certificate is installed and has the proper settings

Export Certificates

You will need to export the Certificate from the CA and from the FLEX Server.  These should be placed in a location accessible by the clients you will use to connect to the FLEX server from.  They need to be trusted on those endpoints in order to connect and pull policies properly from a FLEX Server.  If you don’t have the full certificate chain installed and trusted on the endpoint, you will receive an error that the VM can’t contact the policy server.

Export the Certificate from the Certification Authority

Screen Shot 2014-12-22 at 11.24.18 AM

Export FLEX server certificate

Screen Shot 2014-12-22 at 6.14.37 PM

Place them in a location you can get to from the client systems.

Trusting Certificates in Fusion:

Copy the certs to your Mac system and double-click them to open them in Keychain Access.  The certificates should be in the login section of Keychain Access.

  • Open the FLEX server certificate and expand Trust.  Select “Always Trust” for SSL.
    • Save the Changes
  • Open the Root CA certificate and expand Trust.  Select “Always Trust” and save changes.

Copy both of the Certificates to “System” Folder to make sure they are trusted by all users and local system processes such as the .VMX processes in Fusion

Screen Shot 2014-12-22 at 5.31.39 PM

Screen Shot 2014-12-22 at 5.32.23 PM

Screen Shot 2014-12-22 at 5.32.43 PM

Screen Shot 2014-12-22 at 5.33.12 PM

Trusting Certificates in Windows for Player Pro:

We need to install the FLEX certificate and the Root CA certificate into the Windows system which will run VMware Player Pro and host the FLEX VMs.  Copy the certificates to the Windows system.

  • Open the Certificates MMC snapin – first as Current user
    • Import the FLEX server certificate into Personal | Certificates
    • Import the Root CA certificate into Trusted Root Certification Authorities | Certificates
      • This may already be there if the client is a member of the same AD Domain
    • Open the Certificates MMC snapin – as Local Computer
      • Import the FLEX server certificate into Personal | Certificates
      • Import the Root CA certificate into Trusted Root Certification Authorities | Certificates
      • This may already be there if the client is a member of the same AD Domain

Screen Shot 2014-12-22 at 6.43.09 PM


Install VMware Mirage 5.2 Management Server:

Before installing the Mirage 5.2 Management server, make sure you have a SQL server setup with appropriate permissions to create the Mirage database.   Mirage also requires that the .NET 3.5.1 Framework feature is installed on the server.

  • Make sure the .NET 3.5.1 Framework feature is enabled on the server.
  • Open a command prompt as Administrator
  • Browse to the director containing the Mirage installation.
  • Execute mirage.management.server.x64.21788.exe (or latest build)
  • Enter the SQL server name and instance where the Mirage DB will be located.   You can also choose a new storage area where Mirage client data will be located.Screen Shot 2014-12-21 at 2.20.21 PM
  • Select the account to run the Mirage Management Server as.   For production environments, it is recommended to use a Domain account.

Screen Shot 2014-12-21 at 2.21.36 PM

Walk through the remainder of the installation process and leave the Administrator console open.

Install Mirage 5.2 Server:

The Mirage server is a stateless system that does the processing and should be scaled out horizontally in a production environment.   There should be a minimum of two Mirage servers in any production environment which are load balanced.

  • Execute mirage.server.x64.21788.exe or latest build
  • Enter the SQL server name and instance that was used to install the Mirage management server.   A custom path can also be entered for the Local Cache.  This is the deduplication store and will benefit from fast storage such as SSD.

Screen Shot 2014-12-21 at 2.35.23 PM

  • Choose to use SSL or not for the Mirage server transport.   It is highly recommended to use SSL and it is a requirement if you want to use the Mirage Gateway feature for external access from a Mirage management perspective. NOTE:  The Mirage Gateway will only handle Mirage (tcp 8000) traffic.  It will not handle FLEX traffic (tcp 7443).  That traffic will need to be port forwarded or managed via a reverse HTTPs proxy to allow external connectivity.  You can use the self-signed certificate that Mirage creates or a third-party or internally generated certificate here.

Screen Shot 2014-12-21 at 2.40.36 PM
Screen Shot 2014-12-21 at 2.43.16 PM

  • Select the system to run the Mirage server service as.  This should be a domain account if you will have more than one Mirage server as they need to be able to access the same storage locations.   This is particularly important if using storage such as CIFS.
  • Finish the installation wizard and choose NO when asked to reboot.
  • Run mirage.management.console.x64.21788 from the administrator console – this will install the MMC based Mirage Management Console.
  • Reboot.

Test Connection to the Mirage Server

We will now test basic connectivity to the Mirage server before installing the Mirage/Flex components.

  • Open the Mirage Management Console on the desktop

Screen Shot 2014-12-21 at 3.21.55 PM

  • Right-Click VMware Mirage and choose “Connect to Server on localhost”.  Verify successful connection.

Screen Shot 2014-12-21 at 2.49.21 PM

Screen Shot 2014-12-21 at 2.51.21 PM

Install Mirage Web Management Components:

We will now install the Mirage Web Management Components.   This is where the FLEX admin console is located.  There are some requisites we need to verify before intallation.

  • Make sure .NET 4.0 is installed on the server
  • The IIS role must be installed on the server and configured per this excerpt from the Mirage Admin Guide.

Screen Shot 2014-12-21 at 3.27.56 PM

  • Open a command prompt as Administrator and browse to the location where the Mirage installation files are located and execute:mirage.WebManagement.x64.21788.exe in the Web Management folder.
  • Select the location of the Mirage Management server and the ports.  Leave the defaults ports if possible.

Screen Shot 2014-12-21 at 3.33.31 PM

  • Walk through remainder of the wizard and click “Finish” when it is complete.

Create a Folder for Image Downloads

This is the folder where the image files created in FLEX will be download from to the remote clients.  This can be on any web server.  It does not have to reside on the FLEX server.   The only thing to keep in mind is that the file must be able to be downloaded directly without any authentication challenge as FLEX is expecting this.   For this article, I will create the download folder on my FLEX server.

  • Create a folder and assign permissions for users to be able to download the FLEX images.   In my environment I gave the ISR account read access.    Whatever account only needs read only access to the folder at the NTFS level.

Screen Shot 2014-12-21 at 4.04.02 PM

  • Optional – I like to share this directory out to an Administrative Group to make the import process easier.

Screen Shot 2014-12-21 at 5.10.12 PM

Create a Virtual Directory in IIS to allow the FLEX images to be downloaded.

  •  Open the IIS administrator and browse to “VMware Mirage Management Web Site” then click on “rvm”
  • Right-click rvm and choose “Add Virtual Directory”
    • Set an Alias (remember this)
    • Browse to the directory you created earlier for the FLEX images.
    • Click OK

Screen Shot 2014-12-21 at 4.08.38 PM

  • Set the “VMware Mirage Management Web Site” to use the Certificate identified earlier.  This should have been placed in Personal | Certificates.
    • DO NOT use the self-signed certificate that Mirage installs.   It does not have a fully qualified host name in the Subject Alternative Name file and will NOT work with FLEX
    • Select the VMware Mirage Management Web Site and then click “Edit Bindings” on the Right Column.

Screen Shot 2014-12-21 at 11.07.54 PM


Test FLEX Admin Console Connection

You may have to confirm a security exception if using a self-signed certificate.

You will see a page like the one below.  Log in with a domain account that has access to Mirage.

Screen Shot 2014-12-21 at 3.42.11 PM Screen Shot 2014-12-21 at 3.42.31 PM

Now that we have verified basic configuration and connectivity we will configure the FLEX components.

Create FLEX Image: 

We will now create the FLEX image that we want our users to download and that we will manage through policy.   This process needs to be done on VMware Workstation 11 or VMware Fusion 7.x with a FLEX license installed.  The FLEX license is very important because without it you will not be able to set the policy type to “Managed” which is a requirement.  I will be using VMware Fusion in this article.  It should look like this from a versioning perspective.

Screen Shot 2014-12-21 at 4.21.47 PM

Create a new Virtual Machine and Configure it for FLEX

  • Create a new virtual machine using the Easy Install process if preferred.

Screen Shot 2014-12-21 at 4.24.08 PM

  • Customize the Virtual Machine as needed and start the install process.   Wait for the install process to complete.

Screen Shot 2014-12-21 at 4.28.04 PM

  • When the OS install and VMware Tools install process is complete, shut the Virtual Machine down.  We will apply encryption next.
  • Go to Virtual Machine settings and choose “Encryption and Restrictions”

Screen Shot 2014-12-21 at 4.37.21 PM

  • Check “Enable Encryption” – You will be prompted for your username and PW and then the encryption process will start.  Wait for this process to complete.  Remember the password you used to encrypt this VM.  Your users will need this password to use the FLEX VM!
    Screen Shot 2014-12-21 at 4.42.29 PM
  • Select “Enable Restrictions” – You will be prompted for a password to be used to manage restrictions on this VM.  Do not lose this password or you will be unable to change restrictions settings for this VM!

Screen Shot 2014-12-21 at 4.43.43 PM

  • Click the “Configure” button

Screen Shot 2014-12-21 at 4.45.33 PM

  • Select “Managed” in the “Restrictions Type” drop-down:
  • Enter the path to your FLEX Server (Example:  https://flexserver.demo.local:7443)
    • Do NOT add  /rvm at the end of the URL
    • Click “Check Server” then Save
    • Optionally, you can import certificates that will be the only certs trusted for the VM.

Screen Shot 2014-12-21 at 4.47.57 PM

  • Power the VM back on and configure it with any applications you want the user to have.   You can also configure a Mirage client at this time so the system will be protected and you can deploy applications to the VM.  This would also be the time to add this system to the Domain if wanted.

Screen Shot 2014-12-21 at 4.57.27 PM


Screen Shot 2014-12-21 at 5.06.49 PM

  • If you want the FLEX images to join your Domain, you need to prepare them, by installing a VMware RVM service.
    • Open a command prompt as Administrator
    • Browse to the VMware Tools Directory
    • Run rvmSetup.exe -I
    • Verify that the VMware RVM Setup Service is installed.
    • Install any additional required software and shut down the VM

Screen Shot 2014-12-21 at 4.59.51 PM

Import the FLEX image into your FLEX Server:

  • When the VM is shut down, navigate to the Virtual Machine and from Fusion select File | Export to Tar

Screen Shot 2014-12-21 at 5.07.59 PM

  • If you shared out the Downloads directly export it directly there, if not copy it somewhere you can get to from the Mirage Server.  You want to put this .tar file in the Downloads folder you created earlier on the Mirage Server. Tip: Make sure to remove any spaces in the name of the .tar file.  This will make it easier to connect to the URL (example: win7x64flex.tar).
  • Wait for the export and make sure the .tar file is located in the Downloads folder you created earlier.
  • You also need the .vmx file of the Virtual Machine on the Mirage Server.  We will copy that now.
  • If using Fusion, find the Virtual Machine package file and right-click it and choose “Show Package Contents”.  If using Workstation, just open the VM folder and copy out the .vmx file.
    • find the .vmx file and copy it to the Mirage Server.  It shouldn’t be in the downloads folder.  It just needs to be in a location accessible from the Mirage server when you create an image in the FLEX admin console.

Screen Shot 2014-12-21 at 5.19.03 PM

Import Image into FLEX Server:

  • On the Mirage Server, connect to https://servername:7443/rvm
  • Log in and select “Images”
    • Click the “New” Button
    • Provide the following information
      • Image Name:  Friendly Name for this Image
      • Image URL:  Fully Qualified Path to the Image File.  This is the location where you placed the .tar file.  (Example:  https://flexserver.demo.local:7443/rvm/flexdownloads/win7x64flex.tar)
      • Description:  Optional Description of this Image
      • Select Image File:  This is the .vmx file that you exported earlier.  Select browse and select the appropriate .vmx file for this image
      • Icon: Optional Icon for this Image
      • Image EULA:  Optional EULA to be shown when the user uses the image
      • Click OK when all settings are entered.  This will save the image file.

Screen Shot 2014-12-21 at 5.38.47 PM

  • Verify the download URL
    • Open a web browser and paste in the URL path you entered under Image URL
      • Example: https://flexserver.demo.local:7443/rvm/flexdownloads/win7x64flex.tar
        • If you get a permissions error, the NTFS permissions need to be adjusted.  It should ask you to save the file.

Create a Policy:

The FLEX policies control what the default settings are for FLEX managed virtual machines that are controlled by that policy.   Settings include:

  • Expiration Date of the Virtual Machine – The machine can no longer be powered on after that date if the date is not adjusted
  • If USB Devices Can be passed through to the VM
  • If the user can copy/paste data to or from the VM
  • If the user can drag/drop data to or from the VM
  • Messages displayed to users when the machine expires or is getting close to expiring
  • Flex Server URL and how often the client will poll the FLEX server
  • Offline Time limit – how long the VM can be offline with no contact with the FLEX server before it will become locked.

Select the Policies Tab and adjust setting as wanted and click OK

Screen Shot 2014-12-21 at 5.52.40 PM

Create Entitlement:

An Entitlement is the combination of an Image, a Policy set and a user or group of AD users who are entitled to download and execute the VM.

  • Click the Entitlements tab, then click New
  • Enter an Entitlement Name, select an Image and click Next
  • Type an AD user or group and click add
    • this is a little touchy – type part of the user or group name and it will autocomplete
    • Note: it may take a few minutes for newly created accounts to show up.
  • Click Next

Screen Shot 2014-12-21 at 6.00.03 PM

  •  Select the Policy and then click Next

Screen Shot 2014-12-21 at 6.01.16 PM

  • Enter machine patten and domain information if you want these systems to be renamed and added to your domain.

Screen Shot 2014-12-21 at 6.01.56 PM

  • Click next then Finish – Congratulations – You have created a FLEX Image!

Download the FLEX Image from a Client

To download a FLEX managed image, you need either VMware player Pro or Fusion Pro with a FLEX license attached.   To download the image do the following

  • Player Pro with FLEX.
    • Select the “Connect To Server” icon Screen Shot 2014-12-21 at 6.15.03 PM
    • Enter the path to the server
      • Example:  flexserver.demo.local:7443
    • Enter domain credentials for account entitled to the image
      • domain\user
      • Password
    • You may get a certificate warning if you used a self-signed certificate
      • Click “Continue Anyway”

Screen Shot 2014-12-21 at 6.11.46 PM

  • The image(s) the user is entitled to will show up.   The user can now choose to download the image
    • The user will select a folder to place the Virtual Machine in.
    • Monitor the download process.

Screen Shot 2014-12-21 at 6.16.15 PM

Screen Shot 2014-12-21 at 6.27.48 PM

  •  The download can also be monitored from the FLEX admin console at https://flexserver:7443/rvm
    • Select the “Virtual Machines” tab to monitor the download from the server side.

Screen Shot 2014-12-21 at 6.49.08 PM


  •  Once the FLEX VM finishes downloading and extracting you will be prompted for the password the VM was encrypted with to unlock it.

Screen Shot 2014-12-21 at 10.44.10 PM

At this point the VM can be powered on and used by the user.

 VMware Fusion Pro with FLEX

  •  Go to File | Connect to Server or Apple – K
  • Enter the path to the server and the username and password of the Domain user entitled to the image.
  • Example:  flexserver.demo.local:7443
  • Enter domain credentials for account entitled to the image
    • domain\user
    • Password
    • You may get a certificate warning if you used a self-signed certificate.Screen Shot 2014-12-21 at 6.41.21 PM

Select the image and click the “download” icon

Screen Shot 2014-12-21 at 6.47.50 PM
Screen Shot 2014-12-21 at 6.48.12 PM

  •  Once the FLEX VM finishes downloading and extracting you will be prompted for the password the VM was encrypted with to unlock it.
  • Power the machine on and change the restrictions password if prompted.

Screen Shot 2014-12-21 at 10.52.21 PM


Notice my FLEX machine used the naming convention specified in the entitlement and that it also joined the Demo Domain.

NOTE: If you have connectivity or certificate issues you may see the message below.  Double-check the certificates are trusted and also that you have the proper path to the restrictions management server (https://server-fqdn:7433)

Screen Shot 2014-12-23 at 8.47.08 AM

Managing Policies on FLEX deployed Virtual Machines: 

Once you have connect a FLEX VM to the policy server you can connect to https://flexserver:7443/rvm and adjust policy on the individual VM’s

The following can be adjusted on a per-vm basis

Policies:

  • Expiration Date – Date when the machine will no longer be accessible by the user.  It will no longer start up after this date.  The administrator can re-enable the VM by extending the expiration date.
  • Lockout – Lock the VM by revoking access and prevent the user from starting it up.   This can be useful for situations where you need to quickly prevent the user from accessing the system at all.
  • Reactivate – Unlock a VM that is currently locked.
  • USB – Allow or Prevent USB devices from being connected to the FLEX VM
  • Copy/Paste – Allow / Prevent copy and past to/from the FLEX VM
  • Drag / Drop – Allow / Prevent users from dragging and dropping files in / out of the FLEX VM.
    • NOTE:  both copy/paste and drag/drop polices require a system reboot to change the setting
  • Require the user to change the power on passphrase when moving or copying the virtual machine. – When the machine is initially copied down and any time it is moved to another storage location the user must set a new restrictions password

Messages:

  • Message to display when the Virtual Machine Expires
  • Message to display when the Virtual Machine is nearing Expiration

Server Settings:

  • FLEX Server URL:  This should always be https://flexserverfqdn:7443
  • Server Contact Frequency: How often will the client poll the policy server for changes. (minimum setting is 5 minutes)
  • Offline Time Limit: How long can the Virtual Machine go without contacting the policy server before it becomes locked

Screen Shot 2014-12-22 at 6.46.38 PM

Screen Shot 2014-12-22 at 6.48.02 PM

Screen Shot 2014-12-22 at 6.34.44 PM

Screen Shot 2014-12-22 at 11.16.47 AM

Hopefully this article was helpful in assisting the installation and configuration of FLEX. Please let me know if you have an questions or notice any errors in this article.

I can be reached on twitter at @chrisdhalstead

Thanks!

Posted in Horizon FLEX | Tagged , | 13 Comments